
Use the Configuration tab in the Registration module to manage the codes used to mark a student as absent in the school register.
Registration codes can be specific to your school but must be assigned to government codes, in order to conform to government regulations. The default settings for registration codes match those given to government codes.
To manage registration codes, follow the steps below:
- Open the Registration module and select the Configuration tab.
- Select Registration Codes from the right hand menu to display this screen:
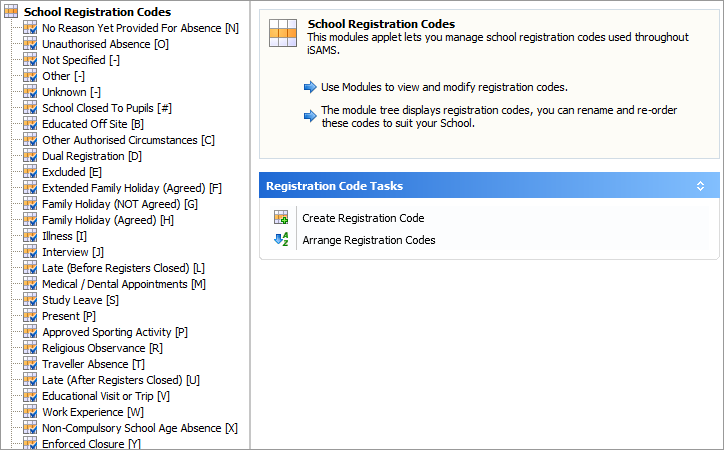
Choose to:

- Click on Create Registration Code in the centre of the screen to display this window:
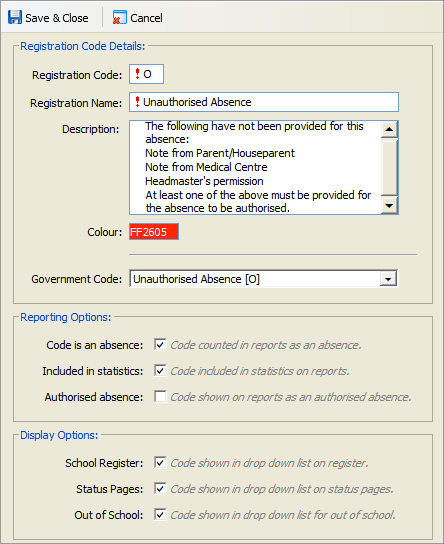
Work through the sections displayed:
Section
Explanation
Registration Code Details
- Registration Code. Enter a single letter, number or symbol which represents the registration code. Each registration code must be unique. You are prompted to try another code if the code you have chosen is already in use.
- Registration Name. Enter a name for the registration code. Use a common term such as 'llness' or 'Authorised Holiday'.
- Description. This is optional. Use this text box to enter more details for the registration code. For example, 'Only assign Authorised Holiday to a student with the Headmaster's permission'.
- Colour. Click on the box and select a colour to represent the registration code. This colour is displayed in the marker box on a register. Use colours to highlight different types of absence. For example, use bright red to highlight 'Unauthorised Absence' and bring your attention to absence which must be addressed.
- Government Code. Use the drop down list to select a government code to assign to the registration code. A registration code must be assigned to a government code in order to conform to government regulation.
Reporting Options
- Code is an absence. Check the box to count this registration code as an absence when running registration reports. Not all codes need to be included as absence in reports. For example, include 'Illness' in your absence reports but not 'Study Leave'.
- Included in statistics. Check the box to include this registration code in statistics when generating registration reports. This box defaults to checked and for absences with this code to be included in absence statistics on reports. You can choose to exclude the registration code from statistics if the absence is due to an event that is out of the pupil's control, such as 'School closure due to snow'.
- Authorised absence. Check the box to display this registration code as an authorised absence when generating registration reports.
It is important to set up registration codes correctly to ensure that accurate reports on student attendance are generated.
Display Options
Limit the use of registration codes in the different view options of registrations. This reduces the margin for error when assigning registration codes to students.
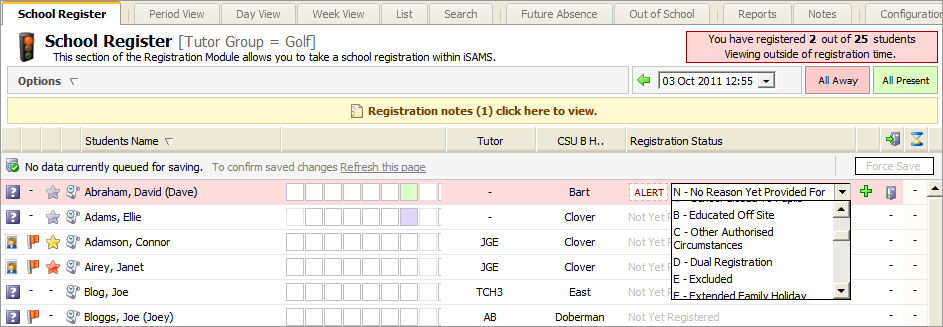
- School Register. Check the box to include the registration code, where made available through the rule, in a drop down box on the school register.
- Status Pages. Check the box to include the registration code, where made available through the rule, in a drop down list on the Period View and List tabs.
- Out of School. Check the box to include the registration code, where made available through the rule, in a drop down list on the Out of School tab. The Out of School tab may only be available to the School Nurse, where this is the case only include 'Illness' and 'Medical Appointments' on the drop down list.
Click Save & Close once the details are as required.
The registration code is now set up. It is listed in the School registration Codes screen and can be selected in a school register: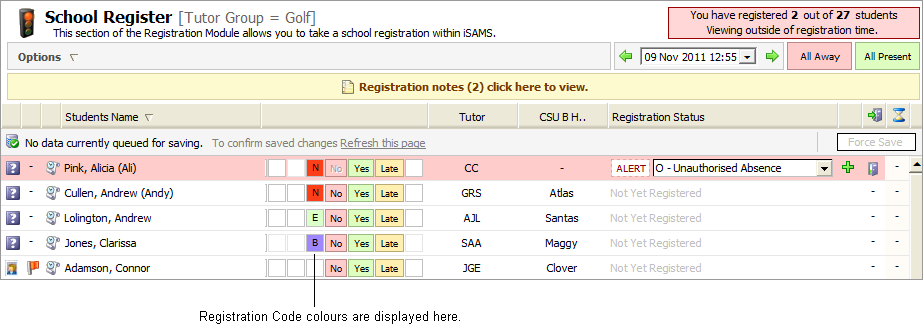
- Click on your selected registration code in the left hand menu to display more information:
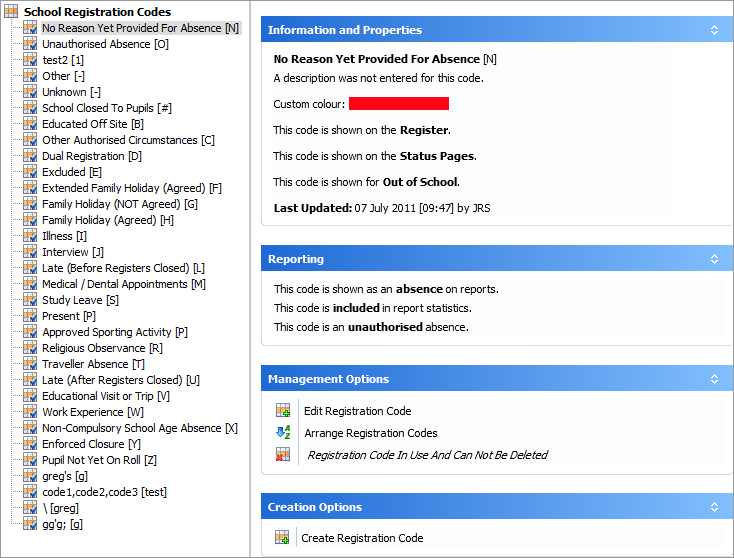
Current properties and reporting settings for the code are displayed in the central panels. - In Management Options, click Edit Registration Code to display this window:
Work through the sections available:
Section
Explanation
Registration Code Details
- Registration Code. Enter a single letter, number or symbol which represents the registration code. Each registration code must be unique. You are prompted to try another code if the code you have chosen is already in use.
- Registration Name. Enter a name for the registration code. Use a common term such as 'llness' or 'Authorised Holiday'.
- Description. This is optional. Use this text box to enter more details for the registration code. For example, 'Only assign Authorised Holiday to a student with the Headmaster's permission'.
- Colour. Click on the box and select a colour to represent the registration code. This colour is displayed in the marker box on a register. Use colours to highlight different types of absence. For example, use bright red to highlight 'Unauthorised Absence' and bring your attention to absence which must be addressed.
- Government Code. Use the drop down list to select a government code to assign to the registration code. A registration code must be assigned to a government code in order to conform to government regulation.
Reporting Options
- Code is an absence. Check the box to count this registration code as an absence when running registration reports. Not all codes need to be included as absence in reports. For example, include 'Illness' in your absence reports but not 'Study Leave'.
- Included in statistics. Check the box to include this registration code in statistics when generating registration reports. This box defaults to checked and for absences with this code to be included in absence statistics on reports. You can choose to exclude the registration code from statistics if the absence is due to an event that is out of the pupil's control, such as 'School closure due to snow'.
- Authorised absence. Check the box to display this registration code as an authorised absence when generating registration reports.
It is important to set up registration codes correctly to ensure that accurate reports on student attendance are generated.
Display Options
Limit the use of registration codes in the different view options of registrations. This reduces the margin for error when assigning registration codes to students.
- School Register. Check the box to include the registration code, where made available through the rule, in a drop down box on the school register.
- Status Pages. Check the box to include the registration code, where made available through the rule, in a drop down list on the Period View and List tabs.
- Out of School. Check the box to include the registration code, where made available through the rule, in a drop down list on the Out of School tab. The Out of School tab may only be available to the School Nurse, where this is the case only include 'Illness' and 'Medical Appointments' on the drop down list.
- Click Save & Close.
Only codes which have not been used in registrations can be deleted.
- Click on your selected registration code in the left hand menu to display more information:

- In Management Options, click Delete Registration Code.
You are prompted Are you sure you want to delete this registration code? - Click Yes. The registration code is now deleted.
Change the arrangement of the registration codes used in the school register. Position the most used at the top of the drop down list to save time when taking a register:
To arrange the registration codes used in the drop down list, follow the steps below:
- Click Arrange Registration Codes in the centre of the screen to display this window:
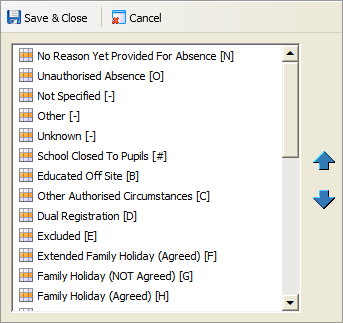
- Use the scroll bar, to scroll down the list of registration codes.
- Click on a registration code.
- Use the arrows,

 , to reposition the registration code in the list.
 - Repeat this process until the list is arranged as required.
- Click Save & Close.
- Click on Create Registration Code in the centre of the screen to display this window: