
Each child activity module listed in the Activities Manager module can be customised so that features suit the specific activity.
For example, enable the Events Result feature in the 'Sports' child module so that the results of sporting fixtures can be logged. The same feature can be disabled for the 'Extra Curricular' child module where it is not needed.
To customise features for a selected child activity module:
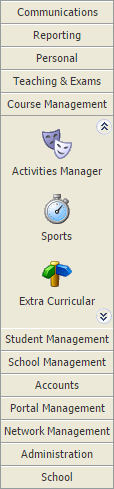
- Select the child activity module that you want to work with from the module bar:
Select the Features tab:

The Features Overview screen is displayed first. This lists all features available with a traffic light indicating whether each feature has been enabled.Select the feature that you want to work with from the right hand menu.


Use the 'True/False' drop-down in the Feature Preferences section to enable or disable timetable features within this child activity.
Use the 'True/False' drop-downs in the Installed Features section to install selected functions within the feature:
- Pupil Timetable. If pupils are linked to an activity, the activity is shown whenever you select to view a pupil timetable.
Activities must be linked to the Pupil Portal for this to work as expected. - Staff Timetable. If staff are linked to an activity, the activity is shown whenever you select to view a staff timetable.
- Parent Timetable. If pupils are linked to an activity, the activity is shown in pupil timetables displayed in the Parent Portal.
Activities must be linked to the Parent Portal for this to work as expected.
- Pupil Timetable. If pupils are linked to an activity, the activity is shown whenever you select to view a pupil timetable.
- Use the drop-down in the Scheduler Defaults section to set the default time for each scheduled item on the activity timetable.

Use the 'True/False' drop-down in the Feature Preferences section to enable or disable registration features in this child activity.
Use the 'True/False' drop-downs in the Installed Features section to install selected functions within the feature:
Late System. Pupils can be marked late in an activity register.
Registration Codes. Codes are used in the register to detail why a pupil is absent and must be individually configured for each activity. Registration codes cannot be imported or copied over from the Registration module or other child activity modules.
- Select the Registration Codes tab to manage the codes you want to use in the activity register:

- Click Create Registration Code to add a new code:

- Enter a clear Registration Code name and code.
- Select 'Yes' to start using the code and click Save & Close.
The new code is displayed in the Registration Codes tab. The icon indicates whether each code is enabled and can be used in the activity register.
 Use the icons available next to each code listed as required:
Icon Use to... 
Change the order that codes are listed in registers. 
Edit details of the code. 
Delete codes that are not needed.

Use the 'True/False' drop-down in the Feature Preferences section to enable or disable report features in this child activity.
Use the 'True/False' Reports Manager Integration drop-down to enable reports to be allocated in the Reports Manager module. Once reports have been allocated, reports can be written for activities.
The report templates which can be allocated to activities must be configured by iSAMS. Contact the iSAMS Help Desk for help creating a customised template.
Set up the fields displayed when exporting activity lists.

Use the 'True/False' drop-down in the Feature Preferences section to enable or disable the export feature in this child activity.
Use the 'True/False' drop-downs in the Installed Features section to install selected functions within the feature:
- Display in Wizards Bar. Activities Manager lists are available in the wizard bar. Even iSAMS users with no access to the Activities Manager can view lists of pupils in each activity.
- Allow Custom Fields. Choose custom fields to display in exports.
- Select the Standard Fields tab to manage the fields you want to be available in exports:

- Click Add Field to add a field in exports:

- Select a field from the Database Field drop-down list and enter a Display Name. The Display Name defaults to match the Database Field selected but this can be changed if necessary. Display Name is displayed in the exported activity list.
- Enter a Field Example. This is compulsory and helps users with their field selections when generating an activity list.
- Enter a Field Size to determine the maximum size of the field. This is measured in pixels. The maximum field size is overridden for entries that exceed the size limit.
- Enter a Field Position to determine the positioning of the field in the activity list. For example, '1' here means that the field is listed first.
- Check Selected by Default for the field to be selected automatically when generating an activity list. This is a useful time saving tool for commonly selected fields such as 'Forename' and 'Surname'.
- Click Save & Close.
The field is displayed in the Standard Fields tab. The icon indicates whether each field is selected by default in activity list. Use the icons available next to each code listed as required:
Icon Use to... Edit details of the field. Remove fields that are not needed. Select the Custom Fields tab and add custom fields to the activity list. Use the same method used for adding standard fields.
If you want to use the exported list as a template for imports ensure you add the Standard Field of 'SchoolId'.
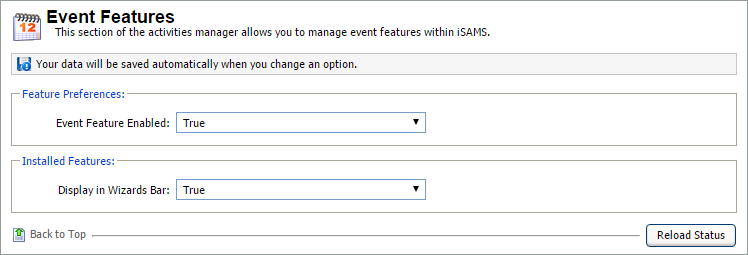
Use the 'True/False' drop-down in the Feature Preferences section to enable or disable event features in this child activity. This feature must be set to 'True' for Event Results Features to operate as expected.
Use the 'True/False' Display in Wizards Bar drop-down in the Installed Features section to enable the events function to be used in child activity modules.
Set to 'True' to display events in the Activity Overview tab in child activity modules. You may prefer to select 'False' if you have no intention of creating events, such as matches, in child activity modules.
Event Features must be set to 'True' for these options to operate as expected.
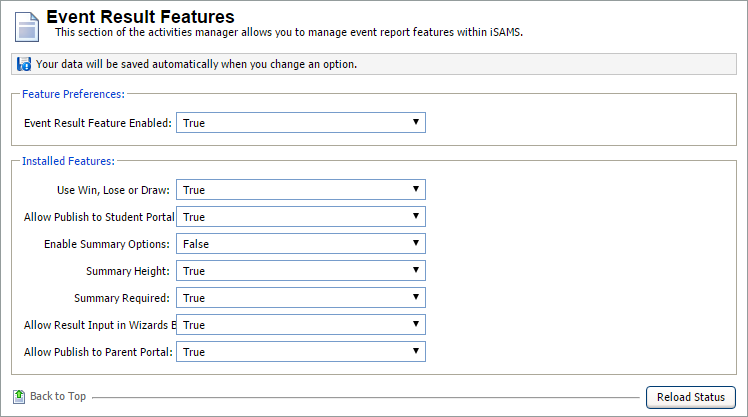
Use the 'True/False' drop-down in the Feature Preferences section to enable or disable event result features in this child activity. Selecting 'True' here enables the Results View tab to display in child activity modules.
Use the 'True/False' drop-downs in the Installed Features section to install result features. There are used when recording events in the Activity Overview tab in child activity modules:
Use Win, Lose or Draw. Selecting 'False' here only allows the score of the event to be recorded.
Allow Publish to Student Portal. Event results are automatically published to the Pupil Portal.
Enable Summary Options. Event summaries can be added when recording events.
- Summary Heights. This feature is not currently in use.
- Summary Required. Event summaries must be entered when recording results, they are not optional.
- Allow Result Input in Wizards Bar. This feature is not currently in use.
- Allow Publish to Parent Portal. Event results are automatically published to the Parent Portal.

Use the 'True/False' drop-down in the Feature Preferences section to enable or disable group features for this child activity in the Parent Portal.
Use the 'True/False' drop-downs in the Installed Features section to display selected activity group details in the Parent Portal:
Show Past/Current/Future Groups. You may prefer to only display current groups to save space.
Show Number of Pupils. You may prefer not to show the number of pupils in each activity group to parents.
Show Gender Breakdown. It may not be relevant to display this, especially in a single sex school.
Show Teachers. Displays the staff running the activity.
Show Start and End Date. Displays the dates that the activity is scheduled to run.

Use the 'True/False' drop-down in the Feature Preferences section to enable or disable schedule features for this child activity in the Parent Portal.
Use the 'True/False' drop-downs in the Installed Features section to display selected activity schedule details in the Parent Portal:
Show Past/Current/Future Schedules. You may prefer to only display current schedules to save space.
Show Number of Pupils. You may prefer not to show the number of pupils in each activity schedule to parents.
Show Locations. Displays the location of the scheduled activity.
Show Teachers. Displays the staff running the scheduled activity.

This feature is not currently in use.
Features displaying a lock icon have been disabled globally. These features must be enabled in the Activities Manager module to be enabled in your selected child activity module.
Feature settings are saved automatically.
Click My Options at the top of the screen and click Reload iSAMS:

This ensures that the features are updated.