
Use the Manage Availability Schedule option in the Timetable Manager module to update room availability in your timetable.
It is useful to allocate periods as unavailable when a room is being used for a regular event which is not listed on your timetable, for example the nursery department of your school are using the room. Also use this function to allocate a period as free in a room timetable and indicate what the room could be used for.
Any period that has not been allocated in a room timetable is reported as available in the Locate Free Objects & Periods option.
To update room availability, follow the steps below:
- Open the Timetable Manager module and select the timetable tab that you want to work with:

- Select the Manage Availability Schedule option from the right hand menu and select the Room Timetables tab:

- Scroll to the room that you want to work with.
- Click Manage Availability next to your selected room to display this window:
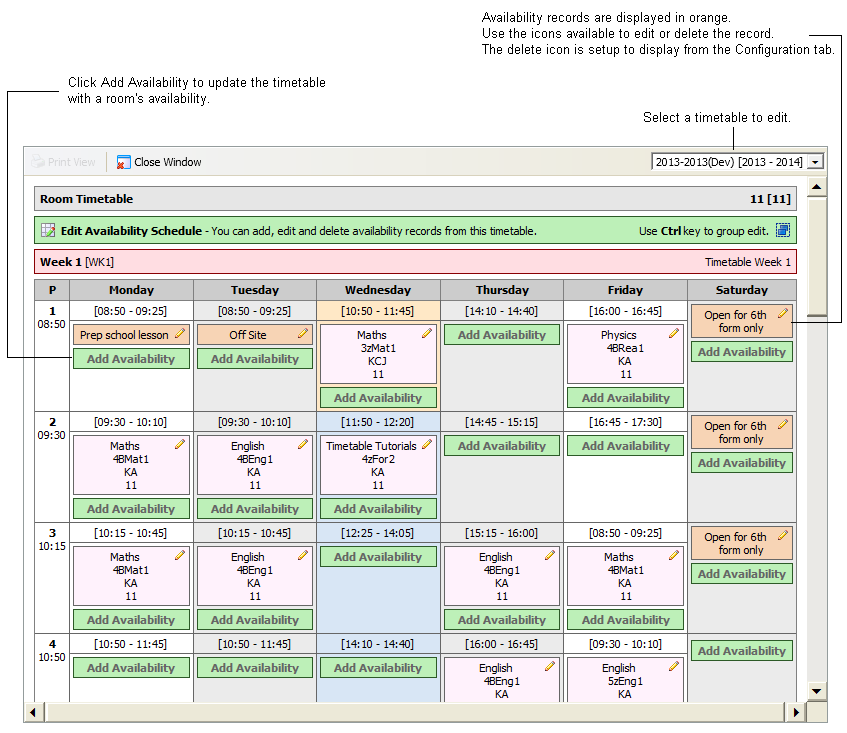
Choose to:

Click Add Availability in your selected period to display this window:
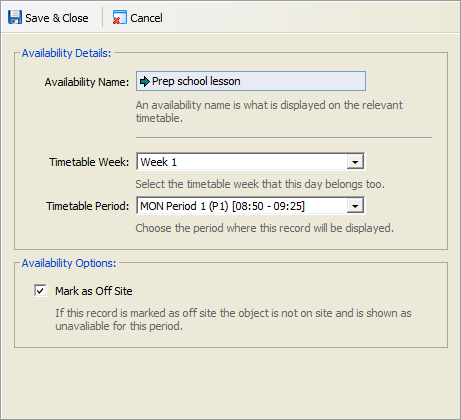
Complete the information required:
Section
Explanation
Availability Details
Availability Name. Enter a name for the entry which identifies the room as available or unavailable for the selected period. Use a concise term to save space when this is displayed in timetables.
Timetable Week. Use the drop down list to select a different timetable week to the one displayed.
Timetable Period. Use the drop down list to select a different period to the one displayed.
Availability Options Mark as Off Site. This box defaults to being checked. Check this box to mark the room as unavailable for the period or periods selected. Uncheck this box to display the Show as Free check box.
Show as Free. This box is displayed when you uncheck Mark as Off Site for the first time. Check this box to mark to the room as available. The room is displayed as available when using the Locate Free Objects & Periods options.
Click Save & Close to go back to your selected timetable.
- Hold Ctrl and click on multiple periods. Your selected periods are listed for you in the green bar above the timetable display.
- Click Group Add Selected:

An example of the window displayed is shown below: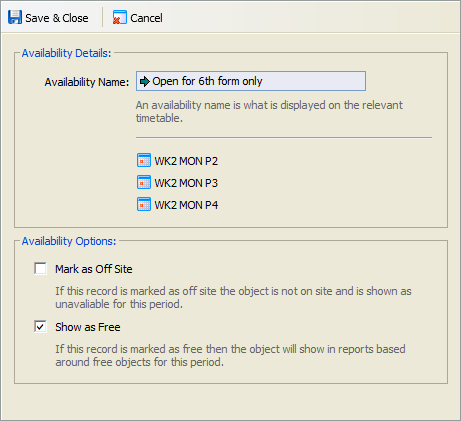
Complete the information required:
Section
Explanation
Availability Details
Availability Name. Enter a name for the entry which identifies the room as available or unavailable for the selected period. Use a concise term to save space when this is displayed in timetables.
The Timetable Week and Timetable Period are already listed when you select more than period.
Availability Options
Mark as Off Site. This box defaults to being checked. Check this box to mark the room as unavailable for the period or periods selected. Uncheck this box to display the Show as Free check box.
Show as Free. This box is displayed when you uncheck Mark as Off Site for the first time. Check this box to mark to the room as available. The room is displayed as available when using the Locate Free Objects & Periods options.
Click Save & Close to go back to your selected timetable.
- Click
 in a selected availability period to display this window:
Edit the details displayed, as required:
Section
Explanation
Availability Details
Availability Name. Enter a name for the entry which identifies the room as available or unavailable for the selected period. Use a concise term to save space when this is displayed in timetables.
Timetable Week. Use the drop down list to select a different timetable week to the one displayed.
Timetable Period. Use the drop down list to select a different period to the one displayed.
Availability Options Mark as Off Site. This box defaults to being checked. Check this box to mark the room as unavailable for the period or periods selected. Uncheck this box to display the Show as Free check box.
Show as Free. This box is displayed when you uncheck Mark as Off Site for the first time. Check this box to mark to the room as available. The room is displayed as available when using the Locate Free Objects & Periods options.
Click Save & Close to go back to your selected timetable.
Hold Ctrl and select the availability periods that you want to edit. Your selected periods are listed for you in the green bar above the timetable display.
- Click Group Edit Selected:

An example of the window displayed is shown below:
Edit the details displayed, as required:
Section
Explanation
Availability Details
Availability Name. Enter a name for the entry which identifies the room as available or unavailable for the selected period. Use a concise term to save space when this is displayed in timetables.
The Timetable Week and Timetable Period are already listed when you select more than period.
Availability Options
Mark as Off Site. This box defaults to being checked. Check this box to mark the room as unavailable for the period or periods selected. Uncheck this box to display the Show as Free check box.
Show as Free. This box is displayed when you uncheck Mark as Off Site for the first time. Check this box to mark to the room as available. The room is displayed as available when using the Locate Free Objects & Periods options.
Click Save & Close to go back to your selected timetable.
Click
 in a selected availability period. This icon is setup to display from the Configuration tab and may not be available.
You are prompted Are you sure you want to delete this availability record from this timetable?Select OK.
The availability for the period is deleted.
Hold Ctrl and select the availability periods that you want to delete. Use this method if no delete icon is available in your timetable. Your selected periods are listed for you in the green bar above the timetable display.
- Click Group Delete Selected:
You are prompted Are you sure you want to delete the selected availability records from all timetables? - Select OK.
The availability for the selected periods is deleted.
Click Close Window to go back to the Room Timetables tab and click
 to display your changes in the tab.