
Use the Vaccinations option in a medical record to add details of inventory items, such as crutches, that have been issued to the patient:

Your security profile's record sensitivity for the option is displayed. In this example, the record sensitivity restriction is 'Low' so you can only view entries with a low record sensitivity.
Choose to:
- Add an inventory entry.
- Edit an inventory entry. Amend an entry that has been incorrectly entered.
- Return an inventory item to stock. Inventory items only have to be returned to stock if they are marked as reusable in Reference Data.
- Archive an inventory entry. This is a useful housekeeping tool for outdated entries. Choose to reverse this procedure if you need to.
- Delete an inventory entry. Remove an entry that has been added in error.
- View an audit log. View a log of changes made to inventory entries.
- Contact iSAMS if you want to create a report using inventory entries.
Add an Inventory Entry
- Open the Medical Centre module and select the Records tab:

- Select Inventory from the right hand menu:

- Click Add Inventory. The Inventory window is displayed:
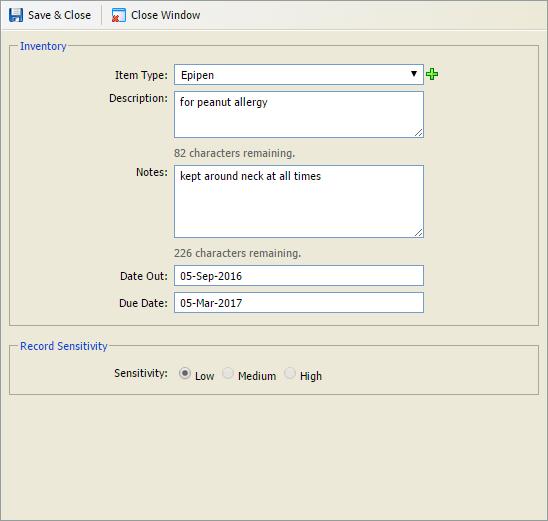
- Select an Item Type for the item or click
 to add a new one.
 - Add a Description if necessary and any Notes that apply to the item. This could include the reason for the item being allocated and when the item should be used.
- Select the date that the inventory item is taken out of stock and when when it is due to be returned or replaced. If the item is not returned by the Due Date it is listed in the Overview tab. Inventory items only have to be returned to stock if they are marked as reusable in Reference Data.
- Set the Record Sensitivity for the entry. This defaults to 'Low'.
- Select Save & Close. The entry is listed in the Manage Inventory screen.
Edit an Inventory Entry
- Open the Medical Centre module and select the Records tab:
- Select Inventory from the right hand menu:
The Manage Inventory screen is displayed: - Use the filters to display the entries that you want to work with:

- Click
 in your selected entry. The Inventory window is displayed:
 - Select an Item Type for the item or click to add a new one.
- Amend the Description if necessary and any Notes that apply to the item. This could include the reason for the item being allocated and when the item should be used.
- Select the date that the inventory item is taken out of stock and when when it is due to be returned or replaced. If the item is not returned by the Due Date it is listed in the Overview tab. Inventory items only have to be returned to stock if they are marked as reusable in Reference Data.
- Change the Record Sensitivity for the entry. This defaults to 'Low'.
- Select Save & Close. The amended entry is listed in the Manage Inventory screen.
Archive an Inventory Entry
Use the archive function to:
- File outdated entries.
or - Return reusable stock inventory items.
- Open the Medical Centre module and select the Records tab:
- Select Inventory from the right hand menu:
The Manage Inventory screen is displayed: - Use the filters to display the entries that you want to work with:
- Click
 in your selected entry.
You are prompted Are you sure you want to archive this record? - Select Yes.

- Reinstate an archived entry by clicking
 in your selected entry.
Delete an Inventory Entry
- Open the Medical Centre module and select the Records tab:
- Select Inventory from the right hand menu:
The Manage Inventory screen is displayed: - Use the filters to display the entries that you want to work with:
- Click
 in your selected entry. The Inventory window is displayed:
- Check that this is the entry that you want to delete.
- Click Delete & Close. The entry is removed from the Manage Inventory screen. A log is kept in the Audit Log.
View an Audit Log
- Open the Medical Centre module and select the Records tab:
Select the Audit Log tab:

Click on an entry to view more detail:

Click Close Window to close the popup.