
Use the Cover Manager module to manage lists of:
Managing Absence Reasons
Use the Absence Reasons option to setup and manage staff absence reasons. You must select an absence reason when marking a teacher as absent and requiring cover.
To manage absence reasons:
- Open the Cover Manager module and select the Configuration tab.
- Select Absence Reasons from the right hand menu:
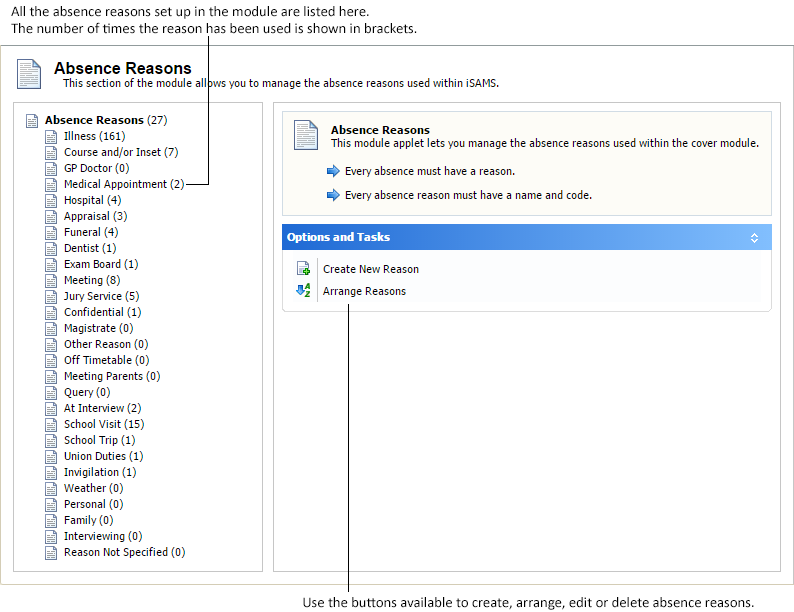
- A number of functions are available from this option. Choose to:
- Create an Absence Reason.
- Arrange the order that absence reasons are displayed throughout the module. Choose to order the most popular absence reasons first to save time. See Arrange Absence Reasons for more information.
- Edit an Absence Reason. Choose to change the confidentially settings for an absence reason or make a reason inactive if it no longer in use.
- Delete an Absence Reason. This is only available if the reason has not been used. The number of times a reason has been used is shown in brackets in Absence Reasons.
Before you mark a teacher as absent you must setup the use of the staff absences system from the Manage Cover tab. See Setup Manage Staff Options for more information.
Create an Absence Reason
To create an absence reason, follow the steps below:
- Click Create New Reason.
An example of the window displayed is shown below:
Complete the sections available:
Section
Explanation
Reasons Details
Reason Name. Enter a clear and concise name for the absence reason. You have the option to add further notes when you mark a teacher absent.
Reason Code. This is used as a short name in the module when space is limited. It is good practice to use a unique code.
Reason Options
Reason is Active. Select Yes to start using the reason.
Confidential Reason. Select Yes and the reason is only displayed when adding or editing a teacher absence. Confidential reasons do not display on reports or the Teacher Cover Timetable when allocating cover to lessons.
Show in Cover Only. Select Yes and the reason is only displayed in the module. It does not display on reports or Timetable Wizards. When Yes is selected for both Confidential Reason and Show In Cover Only, the reason is set as Confidential.
Default Reason. Select Yes for this reason to display first when you add a teacher absence. This is a useful tool to setup for the most common absence reason. Only one reason can be setup as the default.
Click Save & Close.
Arrange Absence Reasons
To arrange the order that absence reasons are listed in the module, follow the steps below:
- Click Arrange Reasons.
An example of the window displayed is shown below:
- Click on an absence reason and use
 or
or  to move your selection up or down the list, as required.
 - Click Save & Close.
Edit an Absence Reason
To edit an absence reason, follow the steps below:
- Select an absence reason to edit from the list displayed.
- Click Edit Cover Reason.
An example of the window displayed is shown below: Complete the sections available:
Section
Explanation
Reasons Details
Reason Name. Edit the name of the absence reason. Use a clear and concise name. You have the option to add further notes when you mark a teacher absent.
Reason Code. This is used as a short name in the module when space is limited. It is good practice to use a unique code.
Reason Options
Reason is Active. Select Yes to start using the reason. Select No when the reason is not in use. Mark a reason inactive instead of deleting it when it has already been selected for a teacher absence.
Confidential Reason. Select Yes and the reason is only displayed when adding or editing a teacher absence. Confidential reasons do not display on reports or the Teacher
Cover Timetable when allocating cover to lessons.
Show in Cover Only. Select Yes and the reason is only displayed in the module. It does not display on reports or Timetable Wizards. When Yes is selected for both Confidential Reason and Show In Cover Only, the reason is set as Confidential.
Default Reason. Select Yes for this reason to display first when you add a teacher absence. This is a useful tool to setup for the most common absence reason. Only one reason can be setup as the default.
Click Save & Close.
Delete an Absence Reason
To delete an absence reason, follow the steps below:
- Select an absence reason to delete from the list displayed. You can only delete absence reasons which have not been used in the module. Absence reasons which have not been used are marked (0) in the list displayed.
- Click Delete Cover Reason.
You are prompted Are you sure you want to delete this reason? - Select Yes and the absence reason is removed from the module.
Managing Unavailable Reasons
Use the Unavailable Reasons option to setup and manage the reasons used to mark staff as unavailable to cover lessons. For example, setup 'Managing Internal Projects' as an Unavailable Reason.
Marking teachers as unavailable, when necessary, ensures that the lists of teachers available for cover is current. Teachers who are already scheduled in a timetable for teaching or meetings do not need to be marked as unavailable.
To manage unavailable reasons:
- Open the Cover Manager module and select the Configuration tab.
- Select Unavailable Reasons from the right hand menu:

- A number of functions are available from this option. Choose to:
- Create a new unavailable reason. See Create an Unavailable Reason for more information.
- Arrange the order that unavailable reasons are displayed throughout the module. Choose to order the most popular reasons first to save time. See Arrange Unavailable Reasons for more information.
- Edit an unavailable reason. Choose to change the confidentiality settings for the reason or make a reason inactive if it is no longer in use. See Edit an Unavailable Reason for more information.
- Delete an unavailable reason. This is only available if the reason has not been used. The number of times a reason has been used is shown in brackets in Unavailable Reasons. See Delete an Unavailable Reason for more information.
Before you mark a teacher as unavailable you must setup the use of the unavailable staff system from the Manage Cover tab. See Setup Manage Staff Options for more information.
Create an Unavailable Reason
To create an unavailable reason, follow the steps below:
- Click Create New Unavailable Reason.
An example of the window displayed is shown below:
Complete the sections available:
Section
Explanation
Unavailable Reason Details
Reason Name. Enter a clear and concise name for the unavailable reason. You have the option to add further notes when you mark a teacher unavailable.
Reason Code. This is used as a short name in the module when space is limited. It is good practice to use a unique code.
Reason Options
Reason is Active. Select Yes to start using the reason.
Confidential Reason. Select Yes and the reason is only displayed when adding or editing a teacher as unavailable. Confidential reasons do not display on reports.
Show in Cover Only. Select Yes and the reason is only displayed in the module. When Yes is selected for both Confidential Reason and Show In Cover Only, the reason is set as Confidential.
Default Reason. Select Yes for this reason to display first when you add a teacher as unavailable. This is a useful tool to setup for the most common unavailable reason. Only one reason can be setup as the default.
Click Save & Close.
Arrange Unavailable Reasons
To arrange the order that unavailable reasons are displayed in the module, follow the steps below:
- Click Arrange Unavailable Reasons.
An example of the window displayed is shown below:
- Click on an unavailable reason and use or to move your selection up or down the list, as required.
- Click Save & Close.
Edit an Unavailable Reason
To edit an unavailable reason, follow the steps below:
- Select an unavailable reason to edit from the list displayed.
- Click Edit Cover Unavailable Reason.
An example of the window displayed is shown below: Complete the sections available:
Section
Explanation
Unavailable Reason Details
Reason Name. Edit the name of the unavailable reason. Use a clear and concise name. You have the option to add further notes when you mark a teacher unavailable.
Reason Code. This is used as a short name in the module when space is limited. It is good practice to use a unique code.
Reason Options
Reason is Active. Select Yes to start using the reason.
Confidential Reason. Select Yes and the reason is only displayed when adding or editing a teacher as unavailable. Confidential reasons do not display on reports.
Show in Cover Only. Select Yes and the reason is only displayed in the module. When Yes is selected for both Confidential Reason and Show In Cover Only, the reason is set as Confidential.
Default Reason. Select Yes for this reason to display first when you add a teacher as unavailable. This is a useful tool to setup for the most common unavailable reason. Only one reason can be setup as the default.
Click Save & Close.
Delete an Unavailable Reason
To delete an unavailable reason, follow the steps below:
- Select an unavailable reason to delete from the list displayed. You can only delete unavailable reasons which have not been used in the module. Unavailable reasons which have not been used are marked (0) in the list displayed.
- Click Delete Cover Unavailable Reason.
You are prompted Are you sure you want to delete this reason? - Select Yes and the unavailable reason is removed from the module.