
Before you begin using the My Network Space module, you must configure it for your establishment. The items you need to configure are:
Field | Used to... |
My Network Space Node Server | Determine how your users access My Network Space. See My Network Space Node Server. |
My Network Space Platforms | Specify whether users can access My Network Space without logging into iSAMS, i.e. by entering a URL in their web browser or using MapDrive. See My Network Space Platforms. |
My Network Space Publication | Specify whether users can access My Network Space through iSAMS and/or the student portal. See My Network Space Publication. |
My Network Space Configuration | Specify general properties for the module. See My Network Space Configuration. |
Following this initial configuration, you can return to these settings and change them as required. It is likely that you will want to do this once you get to know the system better and understand how it works, or if your circumstances change.
My Network Space Node Server
Node server settings determine how your users access My Network Space.
To specify these settings, select My Network Space Node Server in the My Network Space Manager Side Panel. The My Network Space Node Server screen is displayed:
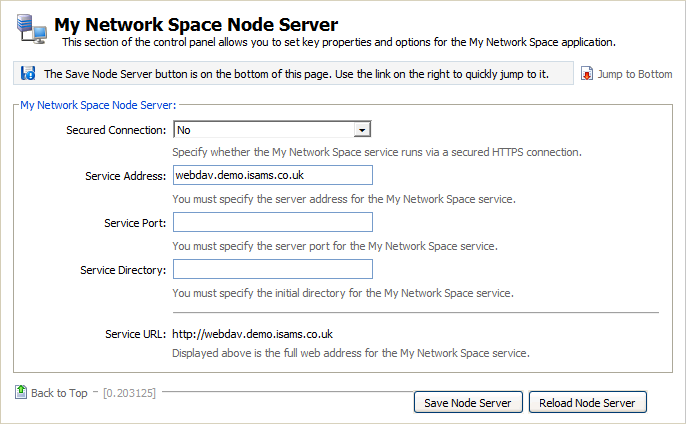
The following fields are available:
Button | Explanation |
Secured Connection | Specify whether access to My Network Space is to be via a secured HTTPS connection. |
Service Address | Specify the address your users should use to access My Network Space. |
Service Port, Service Directory | Use these fields to access My Network Space via a specific port number. You may want to do this, for example, if your establishment is short of IP addresses. Please contact the iSAMS support team for further information. |
Service URL | Display only. The full URL your users should use to access My Network Space is shown, based on your selections in the fields Secured Connection and Service Address above. |
When the details are as required, click Save Node Server.
The Reload Node Server button is available to cancel any changes you have made to these settings, i.e. reset them to their values as they were when you first accessed this form. |
My Network Space Platforms
As well as accessing My Network Space in the usual way through iSAMS, users can access My Network Space directly by:
- Entering the appropriate URL in their web browser.
- Via MapDrive.
You can specify which of these different platforms are available to users. To do this, select My Network Space Platforms in the My Network Space Manager Side Panel. The My Network Space Platforms screen is displayed:

The following fields are available:
Button | Explanation |
Enable Module Breakout | Specify whether users are able to access My Network Space directly by entering the appropriate URL into their web browser. If enabled, users will be able to access My Network Space without first logging into iSAMS, allowing remote access, e.g. from home. |
HTML5 Browser Access | Specify whether users are able to access My Network Space via a browser that supports HTML5, such as Google Chrome, Mozilla Firefox or Apple Safari. (When you use My Network Space in an HTML5 browser, additional functionality is available such as the ability to drag and drop files between your computer and My Network Space.) |
Enable MapDrive Application | Specify whether users are able to access My Network Space through MapDrive application, which will allow them to map a drive on their computer to access My Network Space with a single click. |
Browser Version | Choose the version of the My Network Space browser, i.e. user interface you want your establishment to use. |
When the details are as required, click Save Platforms.
The Reload Platforms button is available to cancel any changes you have made to these settings, i.e. reset them to their values as they were when you first accessed this form. |
My Network Space Publication
By default, users can access My Network Space through iSAMS. It is also possible to provide access via the student portal.
You can specify whether access to My Network Space is to be made available by either or both of these methods. To do this, select My Network Space Publication in the My Network Space Manager Side Panel. The My Network Space Publication screen is displayed:

The following fields are available:
Button | Explanation |
Access via iSAMS Module | Specify whether users can access My Network Space through iSAMS, i.e. by clicking on the My Network Space icon in the left-hand column (Personal category): |
Access via Student Portal | Specify whether users can access My Network Space through the student portal. |
When the details are as required, click Save Publication.
| The Reload Publication button is available to cancel any changes you have made to these settings, i.e. reset them to their values as they were when you first accessed this form. |
My Network Space Configuration
Use the My Network Space Configuration screen to specify general properties for the module.
To access this screen, select My Network Space Configuration in the My Network Space Manager Side Panel. The My Network Space Configuration screen is displayed:

The following fields are available:
Button | Explanation |
Use My Network Space Service | Specify whether you wish to use My Network Space. If you select No, My Network Space will not be able to any of your users. |
My Network Space Name | Enter the Name by which your organisation refers to My Network Space. The default name is 'My Network Space', but you can change this to tailor the module for your organisation. |
Administrator Name, E-Mail, Telephone | Enter your My Network Space Administrator's name and contact details, if you want to make these available to users who experience authentication problems or other errors. |
When the details are as required, click Save Configuration.
The Reload Configuration button is available to cancel any changes you have made to these settings, i.e. reset them to their values as they were when you first accessed this form. |