
The external data you import into the Tracking Manager Module is listed in the External Data tab. Imported files are listed in one of three options, depending on the status of the file:
- Active Data Imports. All imported files marked active are listed here.
- Archive Data Imports. All imported files marked inactive are listed here.
- Incomplete Data Imports. Files are listed here if they have been imported without datasets or students.
Use the functions available in these options to:
- Import new files. See Importing External Data for more information.
- Edit Import Properties and Import Options for a selected file. See Edit Imported Files for more information.
- Amend details of incomplete files. See Amend Incomplete Files for more information.
- Change the order that imported files are listed in the Tracking Manager Module. See Arrange Imported Files for more information.
- Delete imported files from the Tracking Manager Module. See Delete Imported Files for more information.
Edit Imported Files
To edit the Import Properties or Import Options of a file, follow the steps below:
1. Select the External Data tab.
2. Select the appropriate option from the right hand menu. Either:

or
or
3. Click  in your selected file.
The Edit Data Import window is displayed. An example is shown below:
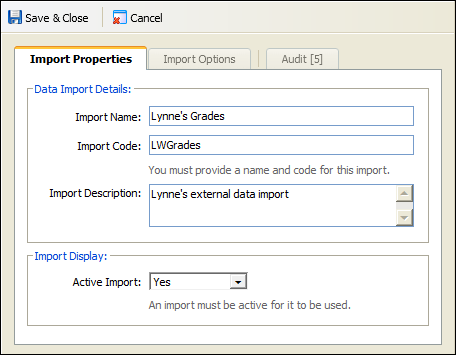
4. Select the Import Properties tab and edit the sections available, as required:
Section | Explanation |
Data Import Details | Import Name. Change the name used to describe the imported file. The file is listed under this name in the module, ensure that it is easily identifiable. Import Code. Change the code used to identify the imported file. Use a more concise term if required, this is displayed in your Tracking Model. Import Description. Enter a brief description of your imported file. This is displayed in the appropriate Data Import option (Active, Archive or Incomplete) in the External Data tab. |
Import Display | Select Yes to start using the imported file. Active files are listed in Active Data Imports. Selecting No marks the file as inactive. Inactive files are listed in Archive Data Imports. |
5. Select the Import Options tab and edit the sections available, as required:
Section | Explanation |
Data Import Adjustment | Select a Subject Adjustment from the drop down list to apply to the imported file, this is optional. The weight values in the selected Subject Adjustment are applied to your imported file. This causes the data in the imported file to be devalued or revalued. Use this if the results you are importing have been marked higher or lower than expected. |
Import Date Range | This section is optional. Select a date range for the imported file to be added to Tracking Models. You can only add the imported file between these dates. |
6. Click  Save & Close.
The amended file is displayed in the module.
| Use the Audit tab to view a history of changes made to the imported file. |
Amend Incomplete Files
Amend the data within imported files which are listed as incomplete. An external data import may not be complete if imported Dataset Names have not been matched to subjects or imported students have not been matched with students already listed in iSAMS.
To amend an incomplete file, follow the steps below:
1. Select the External Data tab.
2. Select  from the right hand menu.
3. Click in your selected file.
Step 2 of the Import External Data Wizard is displayed.
4. Use  to delete any subjects you do not want to import.
5. Use the Subject Match drop down lists available to match the imported Dataset Names with subjects already listed in iSAMS. For example, match a dataset of English with either English Language or English Literature, as required.
6. Edit the default description of each dataset, if required.
7. Click Next Step to display Step 3 of the Import External Data Wizard.
Arrange Imported Files
Change the order that imported files are displayed in the Tracking Manager Module to suit you. For example, move the most used or most recent files to the top of the list. This saves time when you are selecting files to add your Tracking Model. This function is available in each of the Data Import options, arranging files changes the list of files in your selected option.
To arrange imported files, follow the steps below:
1. Select the External Data tab.
2. Select the appropriate option from the right hand menu. Either:
or
or
3. Click  at the top of the screen.
The Arrange ... Data Imports window is displayed. An example is shown below:

4. Select an imported file and use the arrows available to move it up or down the list:
![]()
![]()
5. Click Save & Close.
6. Click  .
.
The imported files are now displayed in your Tracking Model in the revised order.
Delete Imported Files
Remove any imported files from your Tracking Model that you no longer require.
Choose to:
- Delete individual imported files.
- Delete imported files in bulk. This saves you time when you need to delete a number of imported files from the Tracking Manager Module.
Delete Individual Imported Files
To delete a selected file, follow the steps below:
1. Select the External Data tab.
2. Select the appropriate option from the right hand menu. Either:
or
or
3. Click in your selected file.
You are prompted Are you sure you want to delete this import?
4. Select Yes.
The file is removed from the Tracking Manager Module.
Bulk Delete Imported Files
To delete files in bulk, follow the steps below:
1. Select the External Data tab.
2. Select the appropriate option from the right hand menu. Either:
or
or
3. Select the appropriate button from the top of the screen. Either:

or
or
You are prompted Are you sure you want to delete all the incomplete data imports?
4. Select Yes.
All the files from your selected option are removed from the Tracking Manager Module.