
Use your Tracking Models to compile results and reports from other modules in iSAMS. Analyse the compiled information to monitor the academic performance and progress of pupils.
An example of a Tracking Model is shown below:

Setup your Tracking Models to suit you. For example, choose Tracking Models to display information for groups of pupils or individual pupils. You can also select the status of the pupils you want to include in your Tracking Model, such as whether they are current or former pupils.
See Create a Tracking Model to get started.
Use the features available to manage the Tracking Models you create:
- Copy a Tracking Model. Duplicate an existing Tracking Model. Use this to reproduce Tracking Models containing the same information for different users.
- Edit a Tracking Model. Change the active status or the publication options of the Tracking Model.
- Cut and Paste Tracking Models. Use this to organise your Tracking Models as required. You can choose to 'drag and drop' Tracking Models instead of using the cut and paste functions, if required.
- Delete a Tracking Model. Remove a Tracking Model which is no longer required.
- Arrange Tracking Models. Change the order that Tracking Models are displayed in the Manage Models screen. You may prefer to display your Tracking Models in chronological order.
Create a Tracking Model
To create a new Tracking Model, follow the steps below:
1. In the Manage Models screen, click  in the top left of the Manage Models screen to move between levels of Tracking Folders, if required.
2. Open the Tracking Folder you want to use for your Tracking Model by either:
Double clicking on the Tracking Folder.
or
Right clicking on the Tracking Folder and selecting Open Folder:.. from the menu displayed.
3. Click  in the top left of the screen.
The Create Model window is displayed. An example is shown below:
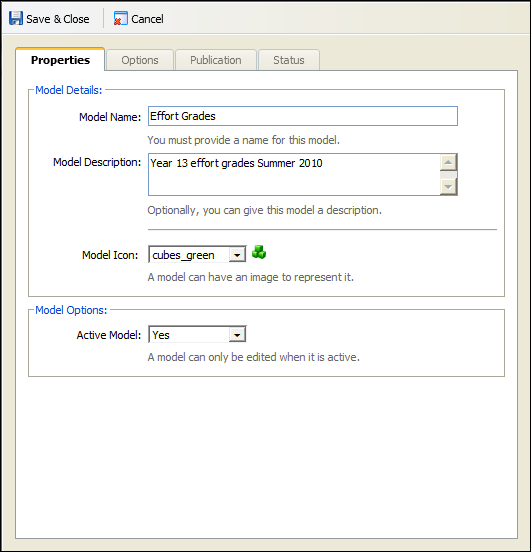
4. Complete the sections available in the Properties tab:
Section | Explanation |
Model Details | Model Name. Enter a concise and unique name for your Tracking Model. Model Description. Provide a full description of the contents of your Tracking Model, if required (the Model Description is displayed in the Models Sidebar). Model Icon. Use the drop down list to select an icon for your Tracking Model. |
Model Options | Active Model. Select Yes to start using the Tracking Model. Selecting No makes the Tracking Model inactive and you are unable to use it. Inactive Tracking Models are greyed out in the Manage Models screen. |
5. Select the Options tab. An example is shown below:
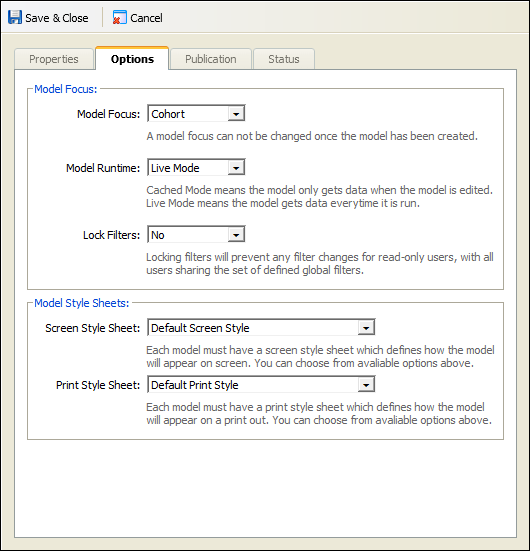
Complete the sections available:
Section | Explanation |
Model Focus | Model Focus.
Model Runtime. Select Live Mode to ensure that your Tracking Model uses up-to-date information each time it runs. Your selection is displayed under Lock Filters. Select to lock the filters to prevent any display changes in your Tracking Models by 'Read-only' users. |
Model Style Sheets | Screen Style Sheet. Select an alternative style sheet to apply to your on-screen Tracking Model, if required. Print Style Sheet. Select an alternative style sheet to apply to your printed versions of Tracking Models, if required. |


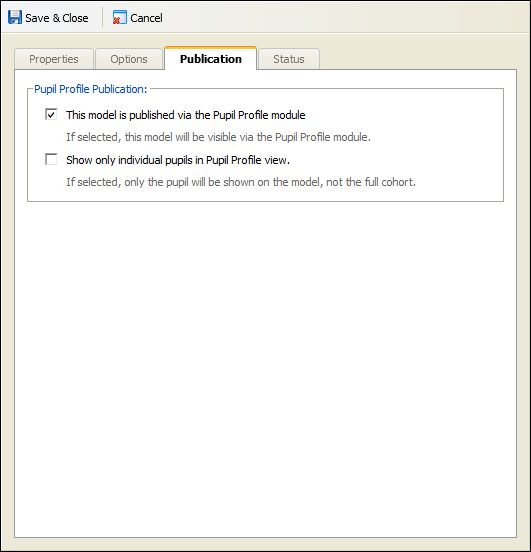
6. Select the Publication tab. Use the check boxes available to select shortcuts to the Tracking Manager Module from the Pupil Profile Module. An example of the Publication tab is shown below:
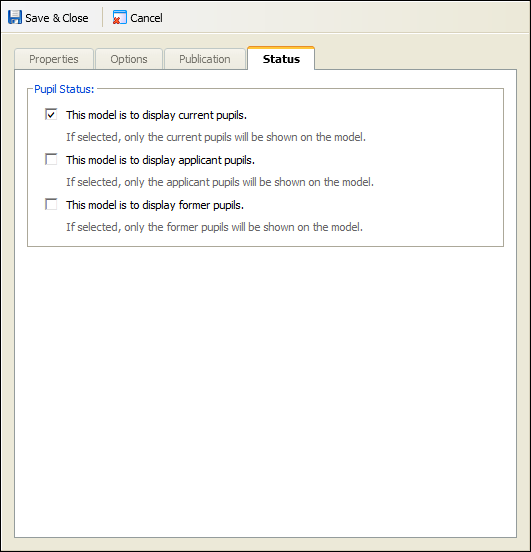
7. Select the Status tab. Use the check boxes to select the status of the pupils you want to include in your Tracking Model. An example of the Status tab is shown below:
8. Click  Save and Close.
Your Tracking Model is displayed in the Manage Models screen. An example is shown below:

You are now ready to start building your Tracking Model by adding pupils to it. See Add Pupils to Your Tracking Model for more information.
Copy a Tracking Model
Duplicate an existing Tracking Model. Use this to reproduce individual Tracking Models, containing the same information, for different users. Each user can then adjust the Tracking Models to suit them.
To copy a Tracking Model, follow the steps below:
1. In the Manage Models screen, click in the top left of the Manage Models screen to move between levels of Tracking Folders, if required.
2. Open the Tracking Folder containing the Tracking Model you want to copy by either:
Double clicking on the Tracking Folder.
or
Right clicking on the Tracking Folder and selecting Open Folder:.. from the menu displayed.
3. Select the Tracking Model you want to copy and either:
Click  in the top of the Manage Models screen.
or
Right click on your selected Tracking Model and select Copy from the menu displayed.
4. Choose to paste the copied Tracking Model, either:
Inside a 'parent' Tracking Folder.
or
Inside a sub folder/'child' Tracking Folder.
5. Click in the top left of the Manage Models screen to locate the Tracking Folder where you want to paste the item.
6. Open the Tracking Folder where you want to paste your copied Tracking Model by either:
Double clicking on the Tracking Folder.
or
Right clicking on the Tracking Folder and selecting Open Folder:... from the menu displayed.
7. Click  in the top of the Manage Models screen to paste the item into the new location.
You are prompted when the Tracking Model has been pasted successfully (it can take several seconds for this prompt to display).
8. Click OK.
A copy of your select Tracking Model is displayed in the Manage Models screen. You are now ready to edit the copy of the Tracking Model. See Edit a Tracking Model for more information.
|
|


Edit a Tracking Model
Change the active status or the publication options of the Tracking Model. You can also change the Tracking Model's properties, such as changing the icon used or add a Model Description.
To edit a Tracking Model, follow the steps below:
1. In the Manage Models screen, open the Tracking Folder containing the Tracking Model you want to edit by either:
Double clicking on the Tracking Folder.
or
Right clicking on the Tracking Folder and selecting Open Folder:.. from the menu displayed.
2. Either:
Click on your selected Tracking Model and select  from the Models Sidebar.
or
Right click on your selected Tracking Model and select Properties from the menu displayed.
or
Select  from the top of the screen. This is available if you have already chosen to run your Tracking Model.
3. The Edit Model window is displayed. An example is shown below:

Edit the sections available in the Properties tab:
Section | Explanation |
Model Details | Model Name. Enter a concise and unique name for your Tracking Model. Model Description. Provide a full description of the contents of your Tracking Model, if required (the Model Description is displayed in the Models Sidebar). Model Icon. Use the drop down list to edit the icon for your Tracking Model. |
Model Options | Active Model. Select Yes to start using the Tracking Model. Selecting No makes the Tracking Model inactive and you are unable to use it. Inactive Tracking Models are greyed out in the Manage Models screen. |
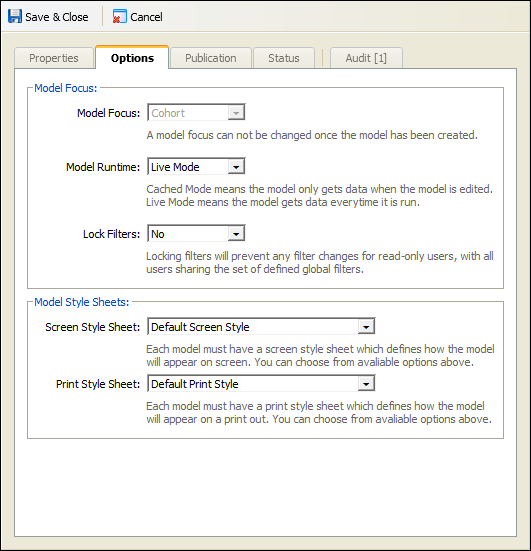
4. Select the Options tab. An example is shown below:
Edit the sections available:
Section | Explanation |
Model Focus | Model Focus. You cannot edit the Model Focus. Setup another Tracking Model if you want an alternative Model Focus. Model Runtime. Select Live Mode to ensure that your Tracking Model uses up-to-date information each time it runs. Your selection is displayed under Lock Filters. Select to lock the filters to prevent any display changes in your Tracking Models by 'Read-only' users. |
Model Style Sheets | Screen Style Sheet. Select an alternative style sheet to apply to your on-screen Tracking Model, if required. Print Style Sheet. Select an alternative style sheet to apply to your printed versions of Tracking Models, if required. |
5. Select the Publications tab. Use the check boxes available to select shortcuts to the Tracking Manager Module from the Pupil Profile Module. An example of the Publication tab is shown below:

6. Select the Status tab. Use the check boxes to select the status of the pupils you want to include in your Tracking Model. An example of the Status tab is shown below:

7. Select the Audit tab to view an audit log for the Tracking Model. The Audit tab is useful for viewing a history of changes made to the Tracking Model. An example of the Audit tab is shown below:

8. Click Save & Close.
Cut and Paste Tracking Models
Use this to organise your Tracking Models as required. For example, move Tracking Models from one Tracking Folder to another by cutting them from one location and pasting them into another.
To cut and paste Tracking Models, follow the steps below:
1. In the Manage Models screen, click in the top left of the Manage Models screen to move between levels of Tracking Folders, if required.
2. Open the Tracking Folder containing the Tracking Model you want to cut by either:
Double clicking on the Tracking Folder.
or
Right clicking on the Tracking Folder and selecting Open Folder:.. from the menu displayed.
3. Select the Tracking Model you want to cut and paste by either:
Clicking  in the top of the Manage Models screen.
or
Right clicking on your selected Tracking Model and select Cut from the menu displayed.
4. Click in the top left of the Manage Models screen to locate the Tracking Folder where you want to paste the item.
5. Open the Tracking Folder where you want to paste the item by either:
Double clicking on the Tracking Folder.
or
Right clicking on the Tracking Folder and select Open Folder:.. from the menu displayed.
6. Click in the top of the Manage Models screen to paste the item in the open Tracking Folder.
You are prompted when the Tracking Model has been pasted successfully (it can take several seconds for this prompt to display).
7. Click OK.
The Tracking Model is displayed in the Manage Models screen.
|
|
Delete a Tracking Model
Remove a Tracking Folder which is no longer required. No copy of kept of the Tracking Model once it is deleted.
To delete a Tracking Model, follow the steps below:
1. In the Manage Models screen, open the Tracking Folder containing the Tracking Model you want to delete by either:
Double clicking on the Tracking Folder.
or
Right clicking on the Tracking Folder and selecting Open Folder:.. from the menu displayed.
2. Either:
Click on your selected Tracking Model and select  from the Models Sidebar.
or
Right click on your selected Tracking Model and select Delete Model from the menu displayed (this is only available for active Tracking Models).
You are prompted Are you sure you want to delete this model?
3. Select Yes.
The Tracking Model is removed from the Tracking Manager Module.
Arrange Tracking Models
Change the order that Tracking Models are displayed in the Manage Models screen. You may prefer to display your Tracking Models in chronological order.
To arrange your Tracking Models, follow the steps below:
1. In the Manage Models screen, select the Tracking Folder containing the Tracking Models you want to arrange.
2. Either:
Click  from the Models Sidebar.
or
Right click on your selected Tracking Model and select Arrange Folders from the menu displayed.
The Arrange Models window is displayed. An example is shown below:

3. Select a Tracking Model and use the arrows available to move it up or down the list:


4. Click Save & Close.
The Tracking Models are now displayed throughout the Tracking Manager Module in the revised order.