
Use the Sorting and Ordering Objects option in the Configuration tab to setup the order that data used in the module is listed. It is recommended that you list all data in order of merit. For example, choose to list effort grades of '1' and exam grades of 'A' first in the module. Apply Sorting Objects in each Tracking Model you create. This helps you to compare information gathered from different sources.
Each Sorting Object consists of Sorting Elements. Use a different Sorting Element for each of the terms used in the Sorting Object. For example, use a Sorting Object for effort grades which contains Sorting Elements for each grade awarded. Setup the Sorting Elements to list all '1' effort grades first and all '5' effort grades last.
An example of the Sorting and Ordering Objects screen is shown below:
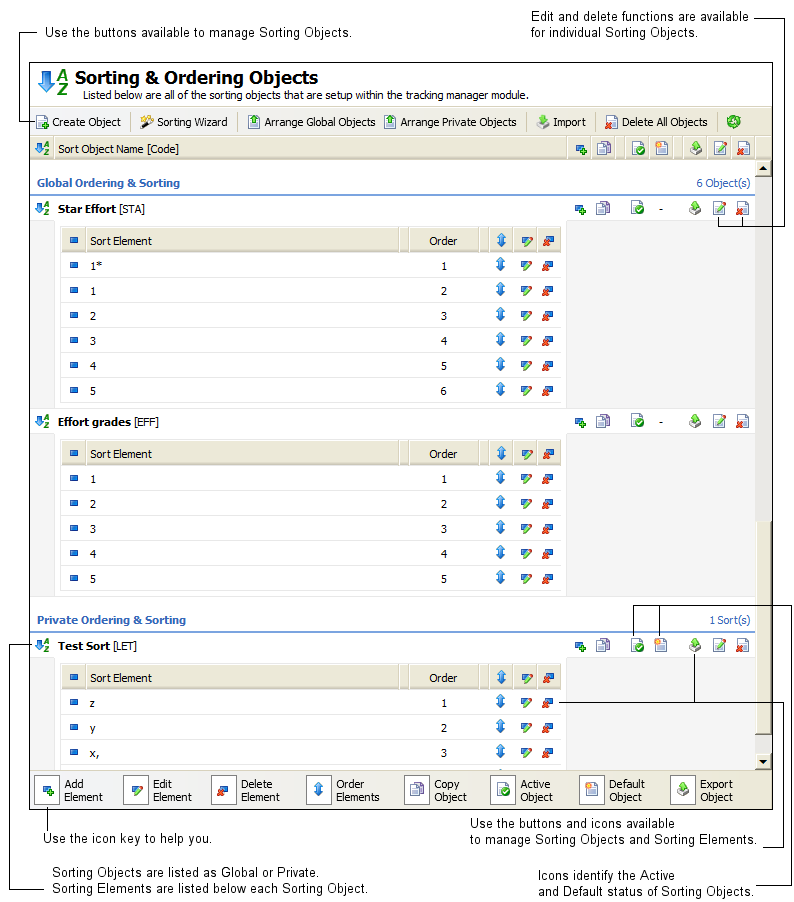
Use the functions available in the Sorting and Ordering Objects screen to:
- Create a Sorting Object. Choose to setup Sorting Objects to be used by all Tracking Manager Module users (Global Objects) or setup your own Private Objects. Private Objects can only be accessed by the user who has set them up. You can setup as many Sorting Objects as you require to represent the different types of data used in the Tracking Manager Module.
- Add a Sorting Element to a Sorting Object. Each Sorting Object consists of Sorting Elements. You can setup as many Sorting Elements as you require for the Sorting Object.
- Use the Sorting Wizard. The Sorting Wizard takes you through steps to create a Sorting Object and add Sorting Elements to it. This ensures that you complete all the steps required to start using Sorting Objects in your Tracking Models.
- Copy an Existing Sorting Object. This duplicates an existing Sorting Object which you can then edit to suit you. This saves time when you have different types of data that you want to order in the same way.
- Edit and delete Sorting Objects if you need to. See Edit a Sorting Object and Delete a Sorting Object for more information.
- Edit and delete Sorting Elements. See Edit a Sorting Element and Delete a Sorting Element for more information.
- Arrange Sorting Objects and Sorting Elements. Change the order that these are displayed in the Tracking Manager Module. See Arrange Sorting Objects and Arrange Sorting Elements for more information.
- Export and import Sorting Objects. Export the XML files of your Sorting Objects to save an external backup of the Sorting Objects you use. See Export a Sorting Object and Import a Sorting Object for more information.
Create a Sorting Object
Create Sorting Objects to arrange the order that data is displayed in the Tracking Manager Module. This is useful as you may have two data sources which use a 1 to 5 scoring system but each of them awards these scores in a different way. For example, effort grades may award a '1' as the highest score and subject assessments may award '1' as the lowest score. By setting up effort grades and subject assessments as Sorting Objects you can choose the order that this data is displayed by order of merit.
Select the Sorting Objects you want to apply to each column you create in your Tracking Models.
To create a Sorting Object, follow the steps below:
1. In the Configuration tab, select Sorting and Ordering Objects from the right hand menu.
The Sorting and Ordering Objects screen is displayed.
2. Click  in the top left of the screen.
The Create Sorting Object window is displayed. An example is shown below:
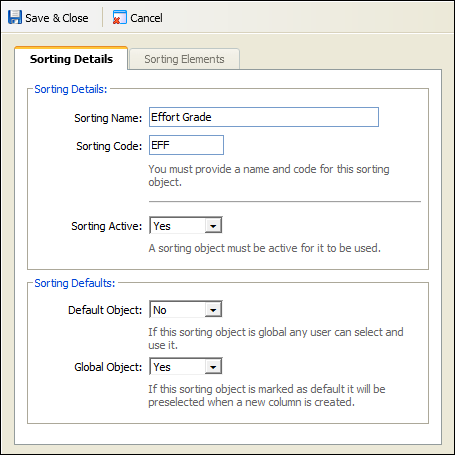
3. Complete the sections available in the Sorting Details tab:
Section | Explanation |
Sorting Details | Sorting Name. Use a clear, concise and unique name for your Sorting Object. This is displayed when creating columns in Tracking Models. Sorting Code. Use a unique code. Choose to amend the default code, if necessary. The default Sorting Code is made up of the first three letters of the Sorting Name and is not always unique. Sorting Codes are displayed when managing columns in Tracking Models. Sorting Active. Select Yes to start using the Sorting Object. Active Sorting Objects are identified by the |
Sorting Defaults | Default Object. Select Yes for this Sorting Object to be preselected when you create new columns in Tracking Models. Default Sorting Objects are identified by the Global Object. Select Yes for all Tracking Manager Module users to use this Sorting Object. Select No for the Sorting Object to be listed as Private (only you can use a Sorting Object listed as Private). |

4. Select the Sorting Elements tab to add Sorting Elements to your Sorting Object.
An example of the Sorting Elements tab is shown below:
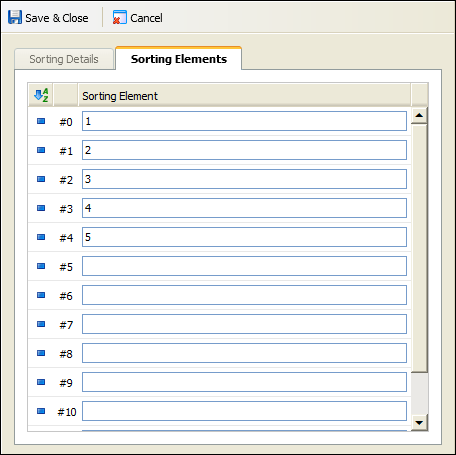
5. Enter the terms used in the data you want to sort. These terms are referred to as Sorting Elements. Complete the fields in order of merit with the highest value Sorting Element in the field marked #0.
6. Click  Save & Close once you have completed the Sorting Element fields.
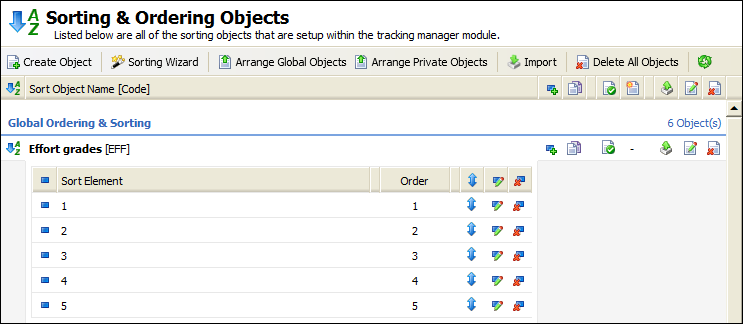
Your Sorting Object, and its associated Sorting Elements, is added to the list of Sorting Objects in the Sorting and Ordering Objects screen. Global Objects and Private Objects are listed separately, all newly created Sorting Objects are at the end of the lists displayed.
An example of how Sorting Objects are displayed in the Sorting Object option is shown below:
Copy an Existing Sorting Object
Copy an existing Sorting Object to save time when have different types of data that you want to order in the same way. After you have copied the Sorting Object, you can choose to edit the Sorting Details and Sorting Elements.
To copy an existing Sorting Object, follow the steps below:
1. In the Configuration tab, select Sorting and Ordering Objects from the right hand menu.
The Sorting and Ordering Objects screen is displayed. An example is shown below:
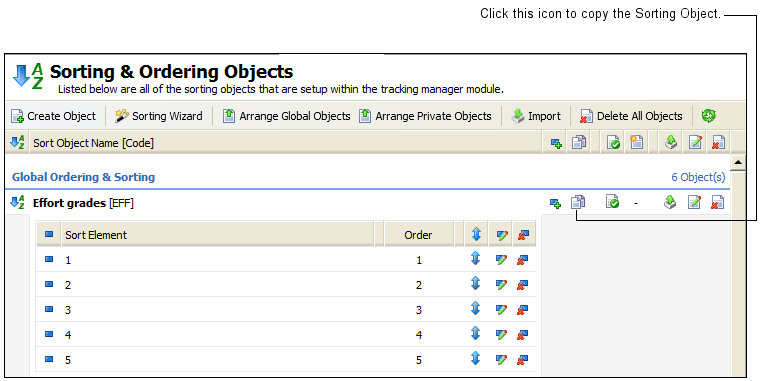
2. Click  in the Sorting Object you want to copy.
You are prompted Are you sure you want to copy this sorting object?
3. Click Yes.
A copy of the Sorting Object and all the associated Sorting Elements is listed in the Sorting and Ordering Objects screen. Copied Sorting Objects are easily identified by name, for example 'Copy of Effort grades'' is listed when 'Effort grades' is copied.
You are now ready to edit the copied Sorting Object and the Sorting Elements associated with it. See Edit a Sorting Object and Edit a Sorting Element for more information.
Edit a Sorting Object
Choose to edit a Sorting Object if you want to change any of its properties. For example, change its active status. It is not recommended that you edit a Sorting Object once it is in use as this can alter your Tracking Models. Choose to copy an existing Sorting Object and then edit the copy if the Sorting Object is already in use.
To edit a Sorting Object, follow the steps below:
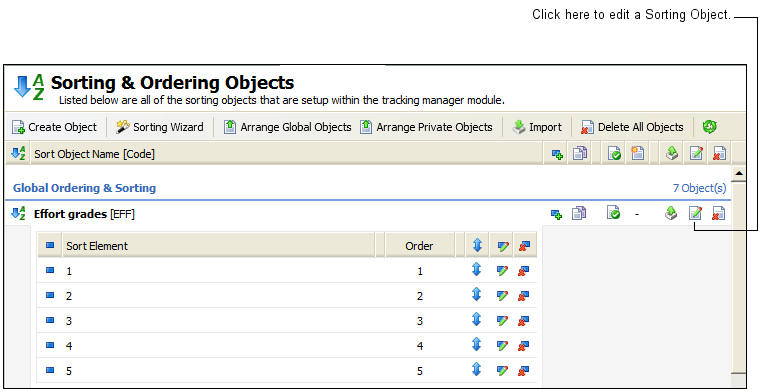
1. In the Configuration tab, select Sorting and Ordering Objects from the right hand menu.
The Sorting and Ordering Objects screen is displayed.
2. Click  in the Sorting Object you want to edit.
See below for the location of the edit icon:
The Edit Sorting Object window is displayed. An example is shown below:
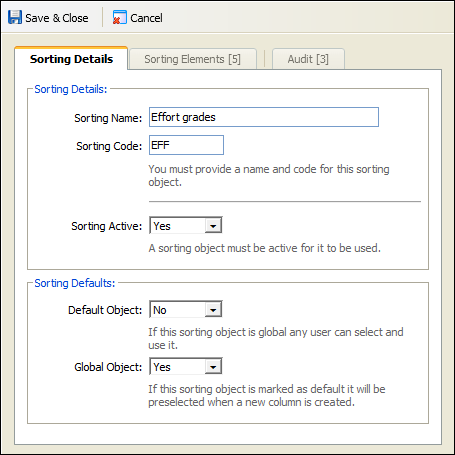
3. Edit the sections available in the Sorting Details tab, as required:
Section | Explanation |
Sorting Details | Sorting Name. Use a clear, concise and unique name for your Sorting Object. This is displayed when creating columns in Tracking Models. Sorting Code. Use a unique code. Choose to amend the default code, if necessary. The default Sorting Code is made up of the first three letters of the Sorting Name and is not always unique. Sorting Codes are displayed when managing columns in Tracking Models. Sorting Active. Select Yes to start using the Sorting Object. Active Sorting Objects are identified by the |
Sorting Defaults | Default Object. Select Yes for this Sorting Object to be preselected when you create new columns in Tracking Models. Default Sorting Objects are identified by the |
4. Select the Sorting Elements tab to edit the Sorting Elements in your Sorting Object.
An example of the Sorting Elements tab is shown below:
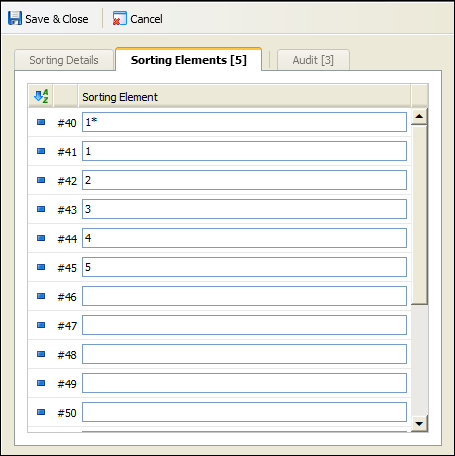
5. Edit the terms used in the data you want to sort. These terms are referred to as Sorting Elements. Complete the fields in order of merit with the highest value Sorting Element at the top of the list. Add new terms, if required.
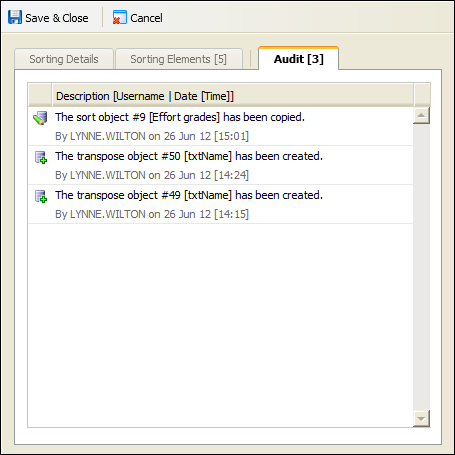
6. Select the Audit tab to view an audit log for the Sorting Object. This is useful for viewing a history of changes made to the Sorting Object.
An example of the Audit tab is shown below:
7. Click Save & Close. The changes you make are displayed in the Sorting and Ordering Objects screen.
Delete a Sorting Object
Choose delete a Sorting Object which you no longer require. You can also choose to delete all of the Sorting Objects in the Tracking Manager Module, if required. Be careful when deleting any Sorting Objects which are already in use. Deleting Sorting Objects alters the Tracking Models they are used in.
To delete a Sorting Object, follow the steps below:
1. In the Configuration tab, select Sorting and Ordering Objects from the right hand menu.
The Sorting and Ordering Objects screen is displayed.
See below for the location of the delete buttons:
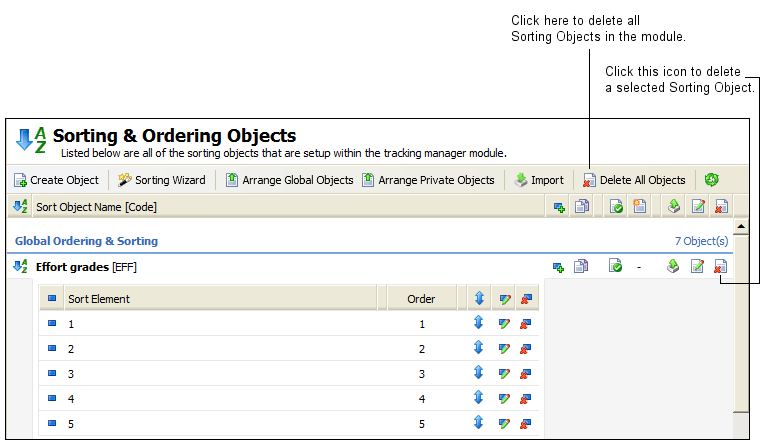
2. Either:
a) Click  in the Sorting Object you want to delete. You are prompted Are you sure you want to delete this sorting object?
b) Select Yes. Your selected Sorting Object is removed from the module.
or
a) Click  . You are prompted Are you sure you want to delete all the sorting objects?
b) Select Yes. All Sorting Objects are removed from the module.
Export a Sorting Object
Export your Sorting Objects to save a backup of the Sorting Objects that you use. This is useful if you have to re-install the module at any point as your Sorting Objects will not be saved. Also choose to export Sorting Objects if you want to share the Sortings Objects that you use with other schools.
To export a Sorting Object, follow the steps below:
1. In the Configuration tab, select Sorting and Ordering Objects from the right hand menu.
The Sorting and Ordering Objects screen is displayed.
2. Click ![]() in your selected Sorting Object.
in your selected Sorting Object.
See below for the location of the edit icon:

You are prompted Do you want to open or save sort.xml...?
3. Open or Save the file as you require. The Sorting Object is exported as an XML document.
If you have selected to save the file, you are prompted when the download is complete.
Import a Sorting Object
Import Sorting Objects from an external source into iSAMS. This is useful when you have had to re-install the module and want to re-install the Sorting Objects that you have previously exported. This also gives you the option of using Sorting Objects recommended by iSAMS or by another school.
To import a Sorting Object, follow the steps below:
1. In the Configuration tab, select Sorting and Ordering Objects from the right hand menu.
The Sorting and Ordering Objects screen is displayed.
2. Click  at the top of the screen.
The Upload Sorting Object window is displayed. An example is shown below:
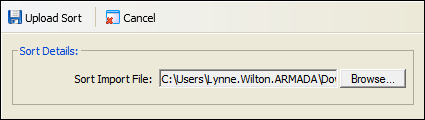
3. Click Browse and select the file you want to import. The file you select must be an XML document.
4. Click  .
.
You are prompted when the import is complete.
5. Click OK.
Your imported Sorting Object is listed in the Sorting and Ordering Objects screen.
Arrange Sorting Objects
Change the order that Sorting Objects are displayed in the module. Global and Private Styles are listed and arranged separately. Choose to the list the most used Sorting Objects at the top of the list, this saves time when you are selecting a Sorting Object for your Tracking Model.
To arrange Sorting Objects, follow the steps below:
1. In the Configuration tab, select the Sorting and Ordering Objects option from the right hand menu.
The Sorting and Ordering Objects screen is displayed.
2. Either:
Click  .
.
or
Click  .
.
The Arrange Sorting Objects window is displayed. An example is shown below:
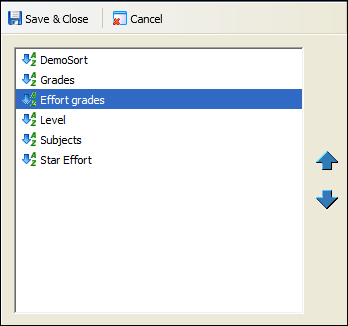
3. Select a Sorting Object and use the arrows available to move it up or down the list:
![]()
![]()
4. Click Save & Close.
The Sorting Objects are now displayed throughout the Tracking Manager Module in the revised order.
Add a Sorting Element
To add a Sorting Element to a Sorting Object, follow the steps below:
1. In the Configuration tab, select Sorting and Ordering Objects from the right hand menu.
The Sorting and Ordering Objects screen is displayed.
2. Click  in your select Sorting Object.
See below for the location of this icon in the Sorting and Ordering Objects screen:

The Create Sorting Element window is displayed. An example is shown below:

3. Enter a term for the Sorting Element. Enter a term used in the data you want to sort, for example a '0' for an unregistered effort grade.
4. Click Save & Close.
The new Sorting Element is added to the end of the list of Sorting Elements associated with the Sorting Objects. An example is shown below:

5. Either:
Add more Sorting Elements, as required.
or
Change the order of the Sorting Elements to reflect the correct order of merit. See Arrange Sorting Elements for more information.
Edit a Sorting Element
Choose to edit a Sorting Element if the term used in the data you are sorting has changed. It is not recommended that you edit a Sorting Element once it is in use as this can alter your Tracking Models.
To edit a Sorting Element, follow the steps below:
1. In the Configuration tab, select the Sorting and Ordering Objects option from the right hand menu.
The Sorting and Ordering Objects screen is displayed.
2. Click  in your selected Sorting Element.
See below for the location of this icon in the Sorting and Ordering Objects screen:

The Edit Sorting Element window is displayed:

3. Edit the term used for the Sorting Element.
4. Click Save & Close.
The changes you make are displayed in the Sorting and Ordering Objects screen.
Delete a Sorting Element
Choose to delete a Sorting Element which you no longer require. Be careful when deleting any Sorting Elements which are already in use. Deleting Sorting Elements alters the Tracking Models they are used in.
To delete a Sorting Element, follow the steps below:
1. In the Configuration tab, select the Sorting and Ordering Objects option from the right hand menu.
The Sorting and Ordering Objects screen is displayed.
2. Click  in your selected Sorting Element. See below for the location of this icon in the Sorting and Ordering Objects screen:

You are prompted Are you sure you want to delete this sorting element?
3. Select Yes.
The Sorting Element is removed from the module.
Arrange Sorting Elements
Change the order that Sorting Elements are displayed in the module. This is quick way to change Sorting Elements into the correct order of merit.
To arrange Sorting Elements, follow the steps below:
1. In the Configuration tab, select the Sorting and Ordering Objects option from the right hand menu.
The Sorting and Ordering Objects screen is displayed.
2. Click  next to any Sorting Element in your selected Sorting Object.
See below for the location of this icon in the Sorting and Ordering Objects screen:

The Arrange Sorting Elements window is displayed. An example is shown below:

3. Select a Sorting Element and use the arrows available to move it up or down the list:
![]()
![]()
List the Sorting Elements in order of merit with the highest value Sorting Element at the top of the list.
4. Continue to move Sorting Elements up and down the list until you are satisfied with the order.
5. Click Save & Close.
The Sorting Elements are now displayed throughout the Tracking Manager Module in the revised order.