
Use the Management Options tab in the Pupil Manager module to configure fields and make default selections in pupil records.
Some of the fields configured here affect areas of the Admissions module.
To configure pupil records fields, follow the steps below:
- In the Pupil Manager module, select the Management Options tab. A number of options are displayed for you to work with:

Select General Options:
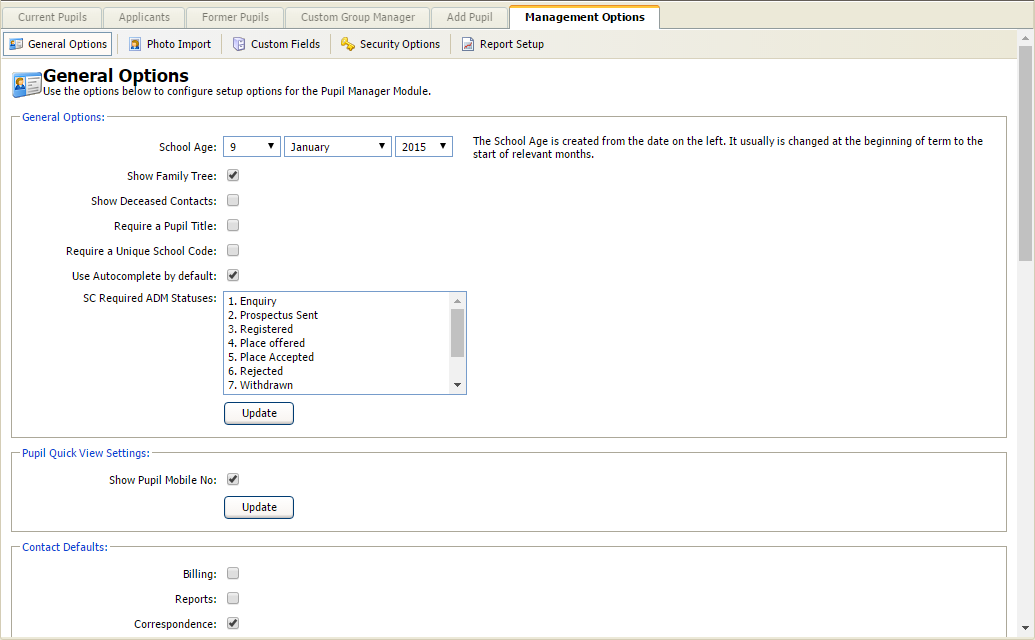
Complete the General Options section:
Field
Explanation
School Age
Set the date as the start date for the current academic year. A start of term age in years and months is displayed on each pupil record.
School Age must be changed for the start of each academic year. Setting a School Age is useful if you want to generate statistics on pupil age at the start of the year.
Show Family Tree
Check this box to display a family tree, including parents and siblings, in pupil records.
Unchecking this box removes parents from the family tree in pupil records. Siblings are still displayed even when this box is unchecked.
Show Deceased Contacts
It is recommended that this box is checked to identify deceased pupil contacts in pupil records.
Unchecking this box removes the term 'deceased' next to deceased contacts in pupil records. Deceased pupil contacts are listed even when this box is unchecked.
Require a Pupil Title
Check this box to add a pupil title when creating and managing pupil records.
Require a Unique School Code
Check this box for a School Code to be compulsory in pupil records.
Use this checkbox in conjunction with the SC Required ADM Statuses list and the School Code Options section further down the screen.
A School Code is compulsory for pupils with the admission status selected in SC Required ADM Statuses.
Unchecking this box still allows you to add a School Code to pupil records but it is not compulsory.
SC Required ADM Statuses
Use this list in conjunction with the Require a Unique School Code checkbox. All pupils which have the admission status you select here must be allocated with a School Code.
Hold Ctrl to make multiple selections.
Click Update to save your General Options selections.
- Keep the Show Pupil Mobile No box checked if you want to hide pupil mobile numbers in the Pupil Quick View. Pupil Quick View/Student Quick View is an option in the wizard bar.
Use the checkboxes in Contact Defaults to preselect features when adding contact details to a new pupil. This can save you time when adding pupil records in bulk. The checkboxes available are explained below:
Field/Checkbox
Set to default...
Billing
To send billing information to pupil contacts.
Reports
To send pupil reports to pupil contacts.
Correspondence
To send general correspondence to pupil contacts. This may include weekly newsletters and sport reports.
Use Joint Label Salutation
To address labels to all contacts when creating a mail merge. For example, 'Mr and Mrs Smith' instead of just 'Mr Smith'.
Salutation Format How joint salutations are displayed when writing to pupil contacts. Update Existing Salutations Check the box if you have changed the Salutation Format and want to update all existing joint contact entries in pupil records. Agents
To activate Admissions Agency information in pupil records. This links the Pupil Manager module to the Agent Manager module.
Admissions Agency information is displayed in Current Pupil and Applicant records. It is not required when adding a new pupil.
Student Home
The pupil contact address is set as the same as the pupil's home address.
Click Update to save your Contact Defaults selections.
Use the checkboxes and fields in the Applicant Options section to enable functions when adding applicants in both the Pupil Manager module and the Admissions module:
Field/Checkbox Use to... Default Term of Entry Preselect the term that new applicants are listed as starting at your school. You may prefer to set this to the 'Autumn' term when most new starters would join the school. Use Data Discrepancy Check Enable the Applicant Checker function when adding a new applicant. This is useful for ensuring that records are not duplicated. Use Auto Enrolment Automatically enrol pupils when they reach a set status (this is set in the AE Adm Status Trigger field). Use the auto enrolment function with caution, you do not want to enrol all applicants to your school. AE Adm Status Trigger Select the admissions status that an applicant must reach before auto enrolment is activated. Use Auto Admissions Number Automatically create admissions numbers once a pupil is enrolled. Admission Number Length Set the number of characters for each admissions number. Auto AN Adm Status Trigger Select the admissions status that an applicant must reach before an admissions number is generated. Minimum ADM Year Set a minimum birth year for applicants to be admitted to the school. - Click Update to save your Applicant Options selections.
- Use the Year Options to set up the format used for Enrolment Year and Leaving Year in pupil records.
Either:- Check the boxes available to display both the start and end of the academic year (for example, 2010/11).
or - Uncheck the boxes available to display only the start of the academic year (for example, 2010).
- Check the boxes available to display both the start and end of the academic year (for example, 2010/11).
- Click Update to save your Year Options selections.
- In the Export Pupil Record Configuration for siblings section, set up how siblings are listed when pupil records are exported to an alternative format.
- Check Show Selected Pupil to include your selected pupil in the sibling information columns in your export.
- Check Show Applicants to include any siblings listed as applicants in your export.
You must select the sibling fields to display when exporting pupil records for your selections to be effective. An example of how your selections are displayed in a Pupil Record Export is shown below:
Use the School Code Options section to determine details of school codes, if they are to be used in your school:
Field/Checkbox Use to... Enable Automatic School Code Automatically generate a school code for each pupil record added. School Code Prefix/Suffix Enter a prefix and suffix to be used for all generated school codes. Start From Enter a number to start the codes from. For example, you may want to start numbering as '00001', rather than '1'. School Code Number Length Enter the maximum number of characters for the school code. This excludes any prefix or suffix that you may have added. Allow override Check to override any school codes which may have already been added to pupil records. Use this function with caution as changes cannot be reversed. Update Empty School Codes Check to populate any records without a school code. - Click Update to save your selections.