
Create Student Data Exports
Export test results for groups of students from the Tracking Manager Module into other formats. Use this to export assessment results, such as MidYIS results to an Excel spreadsheet. This information can then be passed to outside agencies, as required.
To create a Student Data Export file, follow the steps below:
1. Select the External Data tab.
2. Either:
Click  in the right hand menu.
or
Select  the in the right hand menu and click at the top of the screen.
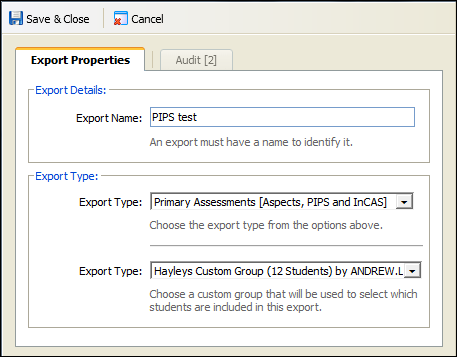
The Create Data Export window is displayed. An example is shown below:

2. Enter a name for the Student Data Export file. Use a clear and concise name, this is displayed in the Tracking Manager Module and the file you export.
3. Use the drop down lists in the Export Type section to:
- Select the Export Type.
- Select the group of students that you want to include in the export file.
4. Click  Save & Close.
The Student Data Export file is now listed in the Manage Student Exports screen. You are now ready to export the data. See Run Student Data Export for more information.
Run Student Data Export
Once you have created a Student Data Export file you can export it as a .zip file.
To export your Student Data Export file, follow the steps below:
1. Select the External Data tab and click in the right hand menu.
2. Click  in your selected file.
You are prompted Do you want to open or save ....zip...?
3. Open or Save the file as you require. The file is exported as .zip file
If you have selected to save the file, you are prompted when the download is complete.
Manage Student Data Exports
Use the Manage Students Export option in the External Data tab to:
- Export Student Data Export files. Export your selected file as a .zip file. See Run Student Data Export for more information.
- Edit the properties of Student Data Export files. Change the name of the file or select a different group of students to include in the export file. See below for more information.
- Delete Student Data Export files. Remove files from the module that you no longer require. See Delete Student Data Exports for more information.
Edit Student Data Export Files
To edit the properties of a Student Data Export file, follow the steps below:
1. Select the External Data tab and click in the right hand menu.
2. Click  in your selected file.
The Edit Data Export window is displayed. An example is shown below:
3. Enter a name for the Student Data Export file. Use a clear and concise name, this is displayed in the Tracking Manager Module and the file you export.
4. Use the drop down lists in the Export Type section to:
- Select the Export Type.
- Select the group of students that you want to include in the export.
5. Click Save & Close.
The amended Student Data Export file is now listed in the Manage Student Exports screen.
| Use the Audit tab to view a history of changes made to the Student Data Export file. |
Delete Student Data Exports
Choose to delete Student Data Export files either individually and in bulk.
To delete Student Data Export files, follow the steps below:
1. Select the External Data tab and click in the right hand menu.
2. Either:
Click  in your selected file. You are prompted Are you sure you want to delete this export?
or
Click  at the top of the screen. You are prompted Are you sure you want to delete all the exports?
3. Select Yes.
Your selected file/s are removed from the Tracking Manager Module.