
Use the Cover Manager module to manage:
- Cover slip messages.
- Cover slip publication options.
- The display of timetables from the wizard bar.
- Feeds from the module.
Managing Cover Slip Messages
Setup the Cover Slip Messages option to send messages to teachers when cover has been arranged for a lesson. The cover slip messages you setup here are sent when you publish cover for the day from the Manage Cover tab. Cover slip messages can be sent by e-mail, SMS or printed format to both the covering teacher and absent teacher to confirm cover arrangements. Choose to setup a different message for covering and absent teachers and for each format you use.
To manage cover slip messages:
- Open the Cover Manager module and select the Configuration tab.
- Select Cover Slip Messages from the right hand menu:

- A number of functions are available from this option. Choose to:
- Create a Cover Slip Message. You must create cover slip messages before you start to make cover arrangements.
- Arrange the order that cover slip messages are displayed in the module. Choose to group e-mail messages or default messages together.
- Edit a Cover Slip Message. Choose to change how the message is published or the wording of the message.
- Delete cover slip messages that you no longer require.
Create or Edit a Cover Slip Message
- Either:
- Click Create Message.
or - Click
 in your selected message.
An example of the window displayed is shown below:
- Click Create Message.
Complete the sections available in the Message Details tab:
Section
Explanation
Message Details
Message Name. Enter a clear and concise name for the message. This is displayed for selection when you publish cover for the day.
Message Code. This is used as a short name in the module when space is limited. It is good practice to use a unique code.
Message Options
Use the checkboxes available to select the following properties for the cover slip message:
- Set the message as the default message selected when you publish cover for the day. Choose to setup a default message for covering and absent teachers and for each format you use, if required.
- Send to teachers covering lessons.
- Send to absent teachers whose lessons are being covered.
- Send as an e-mail.
- Send as an SMS.
- Setup as a suitable for printed format.
Click the Slip Message tab:
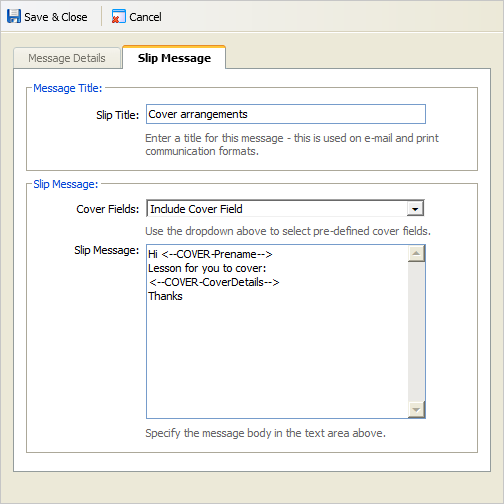
Complete the sections available:
Section
Explanation
Message Title
Enter a clear and concise title for the cover slip message. This is displayed in the subject field for e-mails and as a title in printed format.
Slip Message
Cover Fields. Use the drop down list to select fields to display in the cover slip message. The fields are filled with information held in iSAMS when you publish cover for the day.
Slip Message. The Cover Fields you select are displayed here. Re-position the Cover Fields and add further text to the message, as required. Be careful not to exceed the standard 160 character limit when setting up SMS messages.
For example, the following entry in Slip Message:
'Hi <--COVER-Prename-->
Lesson for you to cover:
<--COVER-CoverDetails-->
Thanks'
Sends this message by SMS to a covering teacher:
'Hi Jo
Lesson for you to cover:
WK1 WED P11 - Mrs Bloggs [JJ] to cover for Miss Jones [EJO] with Y8-/1A in room 23
Thanks'Click Save & Close.
Your cover slip message is displayed in module with the length of the message indicated by number of characters. Cover slip message properties are listed under icons to assist you. Hover over an icon in Cover Slip Messages to see a reminder of its meaning.
An explanation of the icons displayed is shown below:Icon
Explanation
A default message. This defaults to display first when you are publishing cover for the day and are ready to send messages to teachers.

A message for teachers covering lessons.

A message for absent teachers whose lessons are being covered.

An e-mail message.

An SMS message.

A message to be printed.
Click to edit a cover slip message.

Click to delete a cover slip message.
Arrange Cover Slip Messages
To arrange the order of cover slips in the module, follow the steps below:
- Click Arrange Messages.
An example of the window displayed is shown below:
- Click on cover slip message and use
 or
or  to move your selection up or down the list, as required.
 - Click Save & Close.
Delete Cover Slip Messages
To delete cover slip messages, follow the steps below:
- Either:
- Click Delete All Messages to remove all the cover slip messages held in the module. You may want to do this at the start of an academic year. You can then choose to reload default messages using the Component Harness option.
You are prompted Are you sure you want to delete all the messages?
or - Click in a selected cover slip message.
You are prompted Are you sure you want to delete this message?
- Click Delete All Messages to remove all the cover slip messages held in the module. You may want to do this at the start of an academic year. You can then choose to reload default messages using the Component Harness option.
- Select Yes to remove the message/s from the module.
Setting Up Cover Slip Publication Options
Use Publication Options to pre-select different formats of cover slip message to display when you publish cover for the day. For example, pre-select e-mail messages to be sent out to both covering and covered/absent teachers.
The default message you have setup for each format is pre-selected to send out to teachers. Pre-selecting cover slip messages does not stop you using the other messages you have setup, it just saves time as the most common cover slip messages can be published quickly.
To setup cover slip message publication options, follow the steps below:
- Open the Cover Manager module and select the Configuration tab.
- Select Publication Options from the right hand menu.
- In the Publications Defaults tab, use the checkboxes to pre-select the formats you use most often.
An example of the tab displayed is shown below:
- Click Save Options to save your selections. Use Reload Options to reload the last saved settings.
Setting Up Cover Manager in the Wizard Bar
Use Publication Options to setup the Master Cover Timetable in the wizard bar. Also select cover arrangements to display in timetables viewed via the wizard bar. This ensures that users who do not have access to the Cover Manager module can view cover arrangements.
To setup Cover Manager in the wizard bar, follow the steps below:
- Open the Cover Manager module and select the Configuration tab.
- Select Publication Options from the right hand menu.
In the Timetable Display tab, complete the sections available:
Sections
Explanation
Master Cover Timetable Preferences
Use this to specify the number of days in advance users can view the Master Cover Timetable from the wizard bar.
This provides you with a drop down list of days to select when viewing the Master Cover Timetable. This saves time as you can choose to toggle between days.
Click here to see example of the Master Cover Timetable.
Cover Display Publication
Use the checkboxes to provide an option to display cover arrangements in timetables selected from the wizard bar:
- Pupil/Student timetables.
- Teacher timetables.
- Room timetables.
Your selections provide an additional checkbox when viewing timetables from the wizard bar, an example is shown below:

Use this checkbox to display cover arrangements when viewing timetables from the wizard bar.
Key Display Options
Use the checkboxes to provide an option to display cover arrangements in timetables selected from the wizard bar:
- Department timetables.
- Subject timetables.
- Teaching set timetables.
Your selections provide an additional checkbox when viewing timetables from the wizard bar, an example is shown below:
Use this checkbox to display cover arrangements when viewing timetables from the wizard bar.
Click Save Options and select the Application Display tab.
- Check the box displayed to make the Master Cover Timetable available in the wizard bar.
- Click Save Options.
Setting Up Cover Manager Live Feeds
Use Publication Options to set up live Cover Feeds from the Cover Manager module. Once you have setup Cover Feeds, use the Feeds tab to subscribe to it. Any user subscribing to the Cover Feed is informed of current cover arrangements without having to access the Cover Manager module.
Choose to view feeds in a number of ways, for your convenience:
- Via your web browser.
- On your smart phone or tablet computer.
- In MS Outlook.
- On your intranet site.
To setup and subscribe to Cover Feeds, follow the steps below:
- Open the Cover Manager module and select the Configuration tab.
- Select Publication Options from the right hand menu and click on the RSS & XML Options tab:

Complete the sections available:
Section
Explanation
RSS & XML Options
Select Yes to make Cover Feeds available.
RSS Options
Use RSS Cover Feeds. Select Yes to use RSS feeds. This is the most common format of feed to use.
No Cover Available. Enter a message to display in the Cover Feed when no cover arrangements have been made for the day.
Cover Not Published. Enter a message to display in the Cover Feed when no cover arrangements have been published for the day.
XML Options
Use XML Cover Feeds. Select Yes to use XML feeds. This is useful to view a feed via your intranet site, if you use one.
No Cover Available. Enter a message to display in the Cover Feed when no cover arrangements have been made for the day.
Cover Not Published. Enter a message to display in the Cover Feed when no cover arrangements have been published for the day.
Click Save Options to save your selections. Use Reload Options to reload the last saved settings.
- Select the Feeds tab from the top of the module screen.
- Click on the Cover Feed that you want to subscribe to, choose today and tomorrow if required. Your selected feed is displayed, an example is shown below:

- Click 'View feed properties...' to change the settings for your selected feed. You may want to set the feed to update every 15 minutes or just once per day. This is only available in RSS feeds.
Now you have subscribed to your Cover Feed you can access it at anytime via your web browser or other selected method.